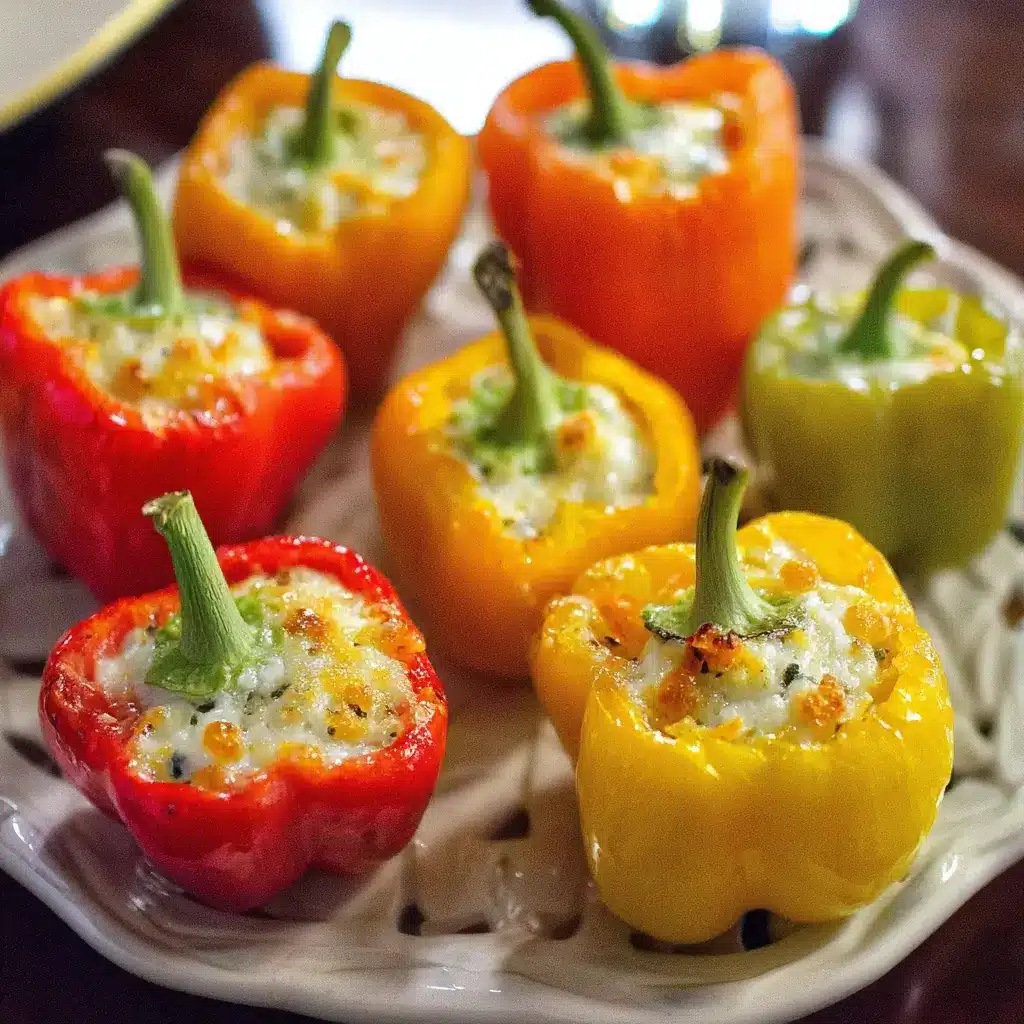
Of all the recipes I’ve developed over the years, some just have a special kind of magic. They’re the ones that disappear from the platter in minutes, the ones that have my kids—who are usually my toughest critics—asking for more before they’ve even finished their first one. These Stuffed Mini Bell Peppers fall squarely into that category. I first made them for a casual Sunday family gathering, hoping for a simple, colorful appetizer that wouldn’t keep me in the kitchen all day. I wasn’t prepared for the reaction. The platter, piled high with these vibrant, jewel-toned peppers, was the first thing to be emptied. My brother-in-law, a man of few words and a very particular palate, declared them “the best appetizer ever.” My kids, initially drawn in by the bright red, orange, and yellow colors, were won over by the warm, creamy, and savory filling. The combination of the slightly sweet, tender-crisp pepper with the rich, cheesy, and seasoned beef filling is just an undeniable hit. It’s that perfect balance of fresh and decadent, making it feel both like a treat and something you can feel good about eating. Now, it’s my go-to recipe for everything from game day parties to elegant holiday get-togethers, and it never fails to impress.
Why You’ll Fall in Love with This Stuffed Mini Bell Peppers Recipe
Before we dive into the nuts and bolts of creating these delicious morsels, let’s talk about why this recipe deserves a permanent spot in your culinary repertoire. It’s more than just an appetizer; it’s a versatile, crowd-pleasing solution for countless occasions.
- Incredibly Versatile: This is not a one-trick pony. Serve them as a stunning appetizer, a light lunch alongside a fresh green salad, a satisfying and low-carb snack, or even as a side dish to complement grilled chicken or steak. They fit in everywhere.
- A Feast for the Eyes: We eat with our eyes first, and these stuffed mini peppers are a vibrant masterpiece. The beautiful array of red, orange, and yellow peppers creates an instantly appealing dish that brightens up any table or buffet spread. They look like you spent hours on them, but they come together with surprising ease.
- Perfectly Balanced Flavors: The magic of this recipe lies in its flavor combination. The natural sweetness of the mini bell peppers, which intensifies as they bake, is the perfect counterpoint to the savory, creamy, and umami-rich filling made with seasoned ground beef and a blend of cheeses. Each bite is a harmonious explosion of taste.
- Crowd-Pleasing Power: It’s rare to find a dish that satisfies almost everyone, but this is it. They are naturally gluten-free and can be easily adapted for different dietary needs. Whether you’re feeding picky eaters, health-conscious guests, or seasoned foodies, these stuffed peppers are a guaranteed winner.
- Ideal for Meal Prep: Life is busy, and recipes that can be prepared in advance are a lifesaver. You can assemble these peppers a day or two ahead of time and simply pop them in the oven when you’re ready to serve, making party hosting significantly less stressful.
Ingredients
This recipe relies on a handful of simple, high-quality ingredients to create its signature flavor. Here’s exactly what you’ll need to create these irresistible bites.
- 1.5 lbs (about 680g) Mini Bell Peppers: These are the star of the show. Look for a bag with a vibrant mix of red, orange, and yellow for the most beautiful presentation. Their thin walls and sweet flavor make them ideal for stuffing and baking.
- 1 lb (450g) Lean Ground Beef: Using lean ground beef (90/10 or 93/7) provides a rich, meaty flavor without making the filling overly greasy. It forms the savory foundation of our stuffing.
- 8 oz (226g) Cream Cheese, softened: This is the key to a luxuriously creamy filling. Make sure your cream cheese is at room temperature for at least 30-45 minutes to ensure it mixes smoothly without any lumps.
- 1 cup Shredded Cheddar Cheese: A sharp or medium cheddar adds a wonderful tangy flavor and a classic cheesy pull when melted. For the best melt, I recommend shredding your own from a block, but pre-shredded works in a pinch.
- ½ cup Shredded Monterey Jack Cheese: Milder and meltier than cheddar, Monterey Jack cheese contributes to the perfect gooey texture and balances the sharpness of the cheddar.
- 1 teaspoon Garlic Powder: Provides a savory, aromatic depth of flavor that complements both the beef and the cheese without the harshness of raw garlic.
- 1 teaspoon Onion Powder: Adds a sweet and savory undertone that rounds out the seasoning profile.
- ½ teaspoon Smoked Paprika: This is a secret weapon, adding a subtle smoky dimension that elevates the entire filling.
- ½ teaspoon Salt (or to taste): Essential for bringing all the other flavors to life.
- ¼ teaspoon Black Pepper: For a touch of gentle spice.
- 2 tablespoons Fresh Chives or Parsley, chopped: A final flourish of fresh herbs adds a burst of color and a clean, bright flavor that cuts through the richness of the cheese and beef.
Instructions
Follow these detailed steps to ensure your stuffed mini peppers come out perfectly every single time. We’ll break it down from prepping the peppers to baking them to golden-brown perfection.
Step 1: Prepare the Oven and Baking Sheet
Preheat your oven to 400°F (200°C). This higher temperature ensures the peppers become tender-crisp while the cheese melts beautifully and gets slightly browned on top. Line a large baking sheet with parchment paper for easy cleanup and to prevent the peppers from sticking.
Step 2: Prepare the Mini Bell Peppers
Wash and thoroughly dry the mini peppers. Slice each pepper in half lengthwise, from the stem to the tip. Use a small spoon or your fingers to carefully scoop out the seeds and the white pith from each half. Arrange the pepper halves, cut-side up, on the prepared baking sheet in a single layer.
Step 3: Cook the Ground Beef
Place a large skillet over medium-high heat. Add the ground beef and cook, using a spatula or wooden spoon to break it up into small crumbles. Continue cooking until the beef is fully browned and no pink remains, which usually takes about 7-10 minutes. Drain any excess grease from the skillet thoroughly. This step is crucial for preventing a soggy filling. Return the skillet with the drained beef to the stove and turn the heat to low.
Step 4: Create the Creamy Filling
To the skillet with the cooked ground beef, add the softened cream cheese, ½ cup of the shredded cheddar cheese, all of the Monterey Jack cheese, garlic powder, onion powder, smoked paprika, salt, and black pepper. Stir everything together continuously over low heat until the cheeses are completely melted and all the ingredients are well combined into a creamy, uniform mixture. Remove the skillet from the heat and stir in the chopped fresh chives or parsley.
Step 5: Stuff the Peppers
Using a small spoon, carefully fill each pepper half with the beef and cheese mixture. Be generous with the filling, mounding it slightly on top. Don’t worry if it seems like a lot; the filling will settle a bit as it bakes.
Step 6: Top with More Cheese and Bake
Sprinkle the remaining ½ cup of shredded cheddar cheese evenly over the top of the stuffed peppers. This will create that irresistible golden, bubbly crust. Place the baking sheet in the preheated oven.
Step 7: Bake to Perfection
Bake for 15-20 minutes. You’re looking for two signs of perfection: the peppers should be tender (easily pierced with a fork) but still have a slight bite, and the cheese on top should be completely melted, bubbly, and starting to turn a beautiful golden brown in spots.
Step 8: Rest and Serve
Carefully remove the baking sheet from the oven and let the peppers rest for at least 5 minutes. This allows the filling to set up slightly, making them easier to handle and preventing you from burning your mouth on the molten cheese. Garnish with an extra sprinkle of fresh herbs if desired, and serve warm.
Air Fryer Instructions
For an even quicker method with a slightly crispier finish, you can use your air fryer!
- Prepare and stuff the peppers as described in steps 2 through 5.
- Preheat your air fryer to 370°F (185°C).
- Place the stuffed peppers in a single layer in the air fryer basket. You may need to cook them in batches depending on the size of your air fryer.
- Air fry for 8-12 minutes, or until the peppers are tender and the cheesy topping is golden and bubbly.
- Let rest for a few minutes before serving.
Nutrition Facts
This recipe provides a balanced mix of protein, fats, and vitamins, making it a satisfying choice.
- Servings: This recipe makes approximately 30-36 stuffed pepper halves, serving 10-12 people as an appetizer.
- Calories per serving (3 pepper halves): Approximately 220-260 kcal.
- Protein: A good source of protein from the ground beef and cheese, which is essential for muscle maintenance and helps keep you feeling full and satisfied.
- Low in Carbohydrates: Mini bell peppers and the cheese-based filling are naturally low in carbs, making this an excellent option for those following a low-carb or ketogenic lifestyle.
- Vitamin C: Bell peppers are packed with Vitamin C, a powerful antioxidant that supports immune function and skin health.
Preparation Time
This recipe is designed to be efficient, making it perfect for both weeknight cravings and party prep.
- Total Time: Approximately 40 minutes
- Prep Time: 20 minutes (slicing peppers, browning beef, mixing filling)
- Cook Time: 20 minutes (baking in the oven)
The preparation is straightforward and can be streamlined by browning the beef while you slice the peppers, making the process feel even faster.
How to Serve
These stuffed mini peppers are incredibly versatile. Here are some fantastic ways to serve them to suit any occasion:
- As a Party Appetizer:
- Arrange them artfully on a large white platter or a rustic wooden board to make their vibrant colors pop.
- Serve them alongside other finger foods like chicken wings, a charcuterie board, or a bowl of guacamole and chips.
- Consider offering a small bowl of sour cream or a zesty ranch dip on the side for dipping.
- As a Light and Healthy Lunch:
- Serve a portion of 4-5 stuffed pepper halves alongside a simple arugula or mixed green salad tossed in a light vinaigrette.
- This combination creates a balanced, low-carb, and protein-packed meal that is both filling and delicious.
- As a Satisfying Side Dish:
- These peppers make an excellent side dish that can replace heavier, starchy options.
- They pair wonderfully with grilled steak, roasted chicken, or a flaky piece of baked fish. Their savory, cheesy flavor complements simply prepared proteins perfectly.
- For Game Day or Casual Get-Togethers:
- Pile them high on a platter and let everyone grab them as they please. They are the ultimate easy-to-eat snack for watching a game.
- They hold up well at room temperature for a while, so you don’t need to worry about them getting cold immediately.
Additional Tips
Unlock the full potential of this recipe with these five expert tips for customization and perfect execution.
- Make-Ahead for Easy Entertaining: This is the ultimate party-prep tip. You can fully assemble the peppers up to 24 hours in advance. Stuff them, arrange them on the baking sheet, cover them tightly with plastic wrap, and refrigerate. When you’re ready to serve, simply remove the plastic wrap and bake as directed, adding 3-5 extra minutes to the baking time to account for the chill.
- Recipe Variations are Endless: Don’t be afraid to customize the filling!
- Spicy Kick: Add finely diced jalapeños or a pinch of red pepper flakes to the beef mixture.
- Smoky Ham and Chive: Swap the ground beef for finely diced cooked ham and increase the fresh chives for a different but equally delicious savory profile.
- Vegetarian Delight: Omit the beef and use a can of drained and rinsed black beans (lightly mashed) or finely chopped mushrooms sautéed with onions as the base.
- The Secret to Perfect Filling: For the smoothest, most homogenous filling, ensure your cream cheese is truly at room temperature. If you’re short on time, you can unwrap the block of cream cheese, place it on a microwave-safe plate, and microwave it in 10-second intervals until it’s soft to the touch but not melted. This prevents a lumpy filling and ensures everything mixes together seamlessly.
- Don’t Overbake the Peppers: The goal is a tender-crisp pepper, not a soft, mushy one. An overbaked pepper will release too much water and can become flimsy. Start checking them at the 15-minute mark. They should be easily pierced with a fork but still hold their shape well when you lift one. This texture provides the perfect contrast to the creamy filling.
- Storing and Reheating Leftovers: If you’re lucky enough to have leftovers, they store beautifully. Let them cool completely, then place them in an airtight container in the refrigerator for up to 3-4 days. The best way to reheat them is in the oven or air fryer at 350°F (175°C) for 5-10 minutes, which will help re-crisp the tops and warm them through without making the peppers soggy like a microwave would.
Frequently Asked Questions (FAQ)
Here are answers to some of the most common questions about making these delicious stuffed mini bell peppers.
1. Can I freeze these stuffed peppers?
Yes, you can! For the best results, freeze them after baking. Let the baked peppers cool completely, then arrange them in a single layer on a baking sheet and freeze until solid. Once frozen, transfer them to a freezer-safe bag or container. They can be stored for up to 3 months. Reheat directly from frozen in a 350°F (175°C) oven for 20-25 minutes, or until heated through.
2. Are these stuffed mini bell peppers keto-friendly?
Absolutely! This recipe is naturally low in carbohydrates and high in fat and protein, making it a perfect fit for a ketogenic diet. The main ingredients—bell peppers, beef, and cheese—are all keto-approved. Just be sure to use full-fat cream cheese and cheese for the best macros.
3. What can I use if I can’t find mini bell peppers?
If mini peppers aren’t available, you can use regular bell peppers. Simply slice two or three large bell peppers in half from stem to bottom, remove the seeds and ribs, and stuff them. You will need to increase the baking time to 30-40 minutes, or until the larger pepper walls are tender. This turns the recipe from an appetizer into a full-fledged main course.
4. My filling seems a bit runny. What did I do wrong?
A runny filling is almost always caused by one of two things: not draining the ground beef thoroughly enough, or using cream cheese that is too soft or watery (sometimes an issue with lower-quality brands). Be sure to drain every bit of grease from your beef. If the filling still seems loose, you can thicken it by adding an extra ounce or two of shredded cheese, which will help it bind together as it melts.
5. Can I prepare the filling ahead of time?
Yes, you can make the filling mixture up to 2 days in advance. Prepare the beef and cheese filling as directed, let it cool, and store it in an airtight container in the refrigerator. When you’re ready to make the peppers, the filling will be firm. You can either let it sit out for about 30 minutes to soften slightly or use it cold (it will just be a bit harder to spoon into the peppers). Then, stuff the peppers and bake as usual.
Conclusion
These Stuffed Mini Bell Peppers are more than just a recipe; they are a celebration of flavor, color, and simplicity. They are proof that you don’t need complex techniques or exotic ingredients to create something truly memorable and universally loved. Whether you’re looking for the perfect party starter, a healthy lunch, or a simple side dish to elevate your dinner, this recipe delivers on all fronts. It’s a dish that brings people together and leaves them smiling. So go ahead, give them a try. I have a feeling they’ll become a staple in your home, just as they have in mine.
Print
Stuffed Mini Bell Peppers
- Total Time: 40 minutes
Ingredients
This recipe relies on a handful of simple, high-quality ingredients to create its signature flavor. Here’s exactly what you’ll need to create these irresistible bites.
- 1.5 lbs (about 680g) Mini Bell Peppers: These are the star of the show. Look for a bag with a vibrant mix of red, orange, and yellow for the most beautiful presentation. Their thin walls and sweet flavor make them ideal for stuffing and baking.
- 1 lb (450g) Lean Ground Beef: Using lean ground beef (90/10 or 93/7) provides a rich, meaty flavor without making the filling overly greasy. It forms the savory foundation of our stuffing.
- 8 oz (226g) Cream Cheese, softened: This is the key to a luxuriously creamy filling. Make sure your cream cheese is at room temperature for at least 30-45 minutes to ensure it mixes smoothly without any lumps.
- 1 cup Shredded Cheddar Cheese: A sharp or medium cheddar adds a wonderful tangy flavor and a classic cheesy pull when melted. For the best melt, I recommend shredding your own from a block, but pre-shredded works in a pinch.
- ½ cup Shredded Monterey Jack Cheese: Milder and meltier than cheddar, Monterey Jack cheese contributes to the perfect gooey texture and balances the sharpness of the cheddar.
- 1 teaspoon Garlic Powder: Provides a savory, aromatic depth of flavor that complements both the beef and the cheese without the harshness of raw garlic.
- 1 teaspoon Onion Powder: Adds a sweet and savory undertone that rounds out the seasoning profile.
- ½ teaspoon Smoked Paprika: This is a secret weapon, adding a subtle smoky dimension that elevates the entire filling.
- ½ teaspoon Salt (or to taste): Essential for bringing all the other flavors to life.
- ¼ teaspoon Black Pepper: For a touch of gentle spice.
- 2 tablespoons Fresh Chives or Parsley, chopped: A final flourish of fresh herbs adds a burst of color and a clean, bright flavor that cuts through the richness of the cheese and beef.
Instructions
Follow these detailed steps to ensure your stuffed mini peppers come out perfectly every single time. We’ll break it down from prepping the peppers to baking them to golden-brown perfection.
Step 1: Prepare the Oven and Baking Sheet
Preheat your oven to 400°F (200°C). This higher temperature ensures the peppers become tender-crisp while the cheese melts beautifully and gets slightly browned on top. Line a large baking sheet with parchment paper for easy cleanup and to prevent the peppers from sticking.
Step 2: Prepare the Mini Bell Peppers
Wash and thoroughly dry the mini peppers. Slice each pepper in half lengthwise, from the stem to the tip. Use a small spoon or your fingers to carefully scoop out the seeds and the white pith from each half. Arrange the pepper halves, cut-side up, on the prepared baking sheet in a single layer.
Step 3: Cook the Ground Beef
Place a large skillet over medium-high heat. Add the ground beef and cook, using a spatula or wooden spoon to break it up into small crumbles. Continue cooking until the beef is fully browned and no pink remains, which usually takes about 7-10 minutes. Drain any excess grease from the skillet thoroughly. This step is crucial for preventing a soggy filling. Return the skillet with the drained beef to the stove and turn the heat to low.
Step 4: Create the Creamy Filling
To the skillet with the cooked ground beef, add the softened cream cheese, ½ cup of the shredded cheddar cheese, all of the Monterey Jack cheese, garlic powder, onion powder, smoked paprika, salt, and black pepper. Stir everything together continuously over low heat until the cheeses are completely melted and all the ingredients are well combined into a creamy, uniform mixture. Remove the skillet from the heat and stir in the chopped fresh chives or parsley.
Step 5: Stuff the Peppers
Using a small spoon, carefully fill each pepper half with the beef and cheese mixture. Be generous with the filling, mounding it slightly on top. Don’t worry if it seems like a lot; the filling will settle a bit as it bakes.
Step 6: Top with More Cheese and Bake
Sprinkle the remaining ½ cup of shredded cheddar cheese evenly over the top of the stuffed peppers. This will create that irresistible golden, bubbly crust. Place the baking sheet in the preheated oven.
Step 7: Bake to Perfection
Bake for 15-20 minutes. You’re looking for two signs of perfection: the peppers should be tender (easily pierced with a fork) but still have a slight bite, and the cheese on top should be completely melted, bubbly, and starting to turn a beautiful golden brown in spots.
Step 8: Rest and Serve
Carefully remove the baking sheet from the oven and let the peppers rest for at least 5 minutes. This allows the filling to set up slightly, making them easier to handle and preventing you from burning your mouth on the molten cheese. Garnish with an extra sprinkle of fresh herbs if desired, and serve warm.
Air Fryer Instructions
For an even quicker method with a slightly crispier finish, you can use your air fryer!
- Prepare and stuff the peppers as described in steps 2 through 5.
- Preheat your air fryer to 370°F (185°C).
- Place the stuffed peppers in a single layer in the air fryer basket. You may need to cook them in batches depending on the size of your air fryer.
- Air fry for 8-12 minutes, or until the peppers are tender and the cheesy topping is golden and bubbly.
- Let rest for a few minutes before serving.
- Prep Time: 20 minutes
- Cook Time: 20 minutes
Nutrition
- Serving Size: one normal portion
- Calories: 260