
Our household is always on the hunt for meals that are both satisfying and don’t require hours of cleanup. Traditional stuffed peppers? Love them, but sometimes the individual stuffing and baking can feel a bit much for a hectic weeknight. That’s where the Stuffed Bell Pepper Skillet swooped in and became an absolute game-changer. The first time I made this, my family was skeptical – “It’s not really stuffed peppers, is it?” they quipped. But one bite in, and the chorus changed to “Wow, this has all the flavor, but it’s so much easier!” It’s got that comforting, hearty taste of classic stuffed peppers – the savory meat, the tender rice, the sweet peppers, and that glorious melty cheese – all brought together in one pan. The aroma alone as it simmers on the stovetop is enough to make everyone gather in the kitchen, eagerly awaiting dinner. It’s become a staple in our rotation, especially on those evenings when time is short but cravings for something wholesome and delicious are high. Plus, the vibrant colors make it a feast for the eyes before it even hits the plate!
Ingredients
- 1 tablespoon olive oil: Extra virgin, for sautéing and adding a touch of fruity richness.
- 1 pound lean ground beef (or turkey/chicken): The star protein; 90/10 or 85/15 works well.
- 1 large yellow onion, chopped: Adds a foundational sweet and savory flavor.
- 2-3 cloves garlic, minced: For that essential aromatic kick.
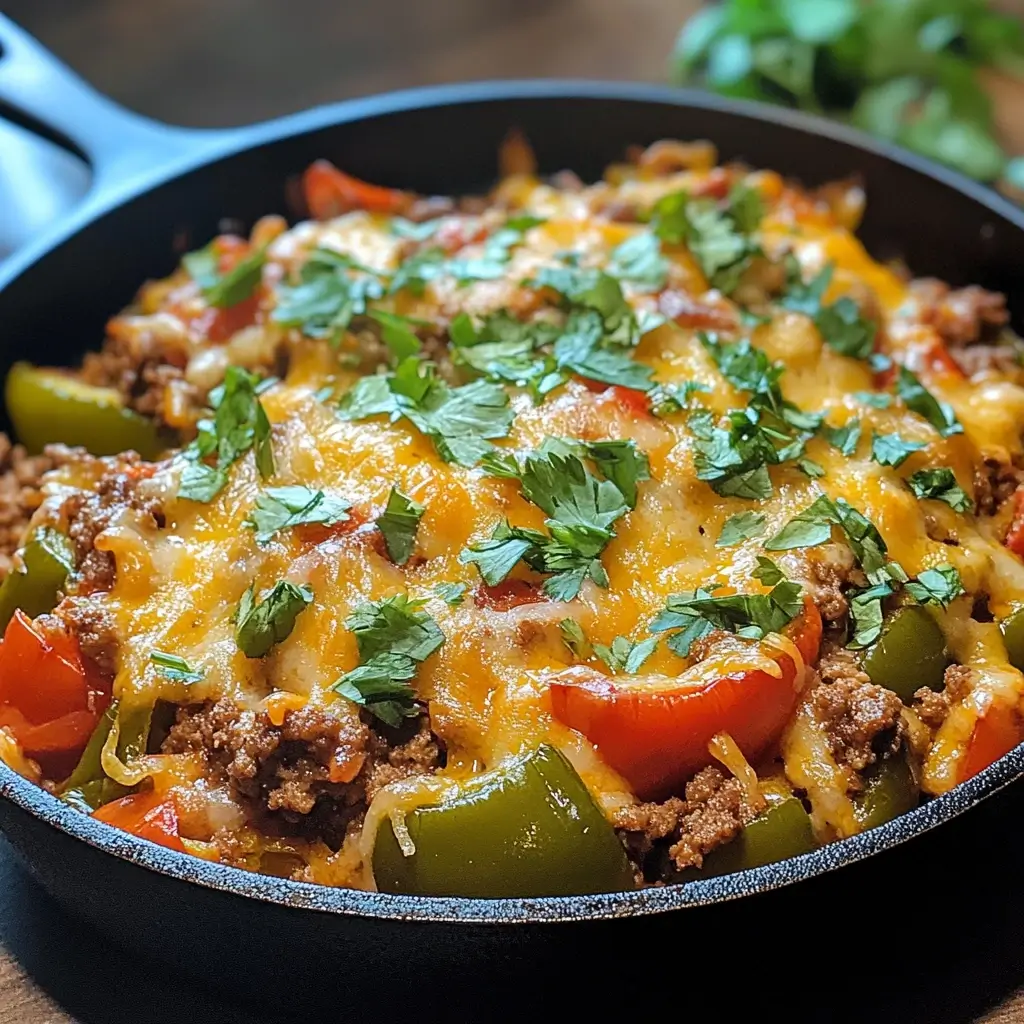
- 3-4 medium bell peppers (assorted colors), cored, seeded, and chopped: The namesake ingredient, providing sweetness, color, and texture. Red, yellow, and orange are often sweeter than green.
- 1 teaspoon dried Italian seasoning: A convenient blend of herbs like oregano, basil, thyme, and rosemary.
- 1/2 teaspoon smoked paprika: Adds a lovely smoky depth.
- Salt and freshly ground black pepper to taste: Essential for enhancing all other flavors.
- 1 (15-ounce) can diced tomatoes, undrained: Provides acidity, moisture, and tomato flavor.
- 1 (8-ounce) can tomato sauce: Contributes to a richer tomato base and smoother consistency.
- 1 cup beef or chicken broth (low sodium preferred): Adds moisture for cooking the rice (if using uncooked) and deepens the savory notes.
- 1 cup uncooked white rice (or 2 cups cooked rice): The starchy component that makes it hearty. Long-grain white rice is a classic choice.
- 1 cup shredded cheddar cheese (or a blend like Monterey Jack/Colby): For that irresistible gooey, cheesy topping.
- Optional: Fresh parsley or chives, chopped: For garnish, adding a touch of freshness and color.
Instructions
- Sauté Aromatics and Brown Meat: Heat the olive oil in a large, deep skillet (preferably oven-safe if you plan to broil the cheese later, at least 12 inches) over medium-high heat. Add the chopped onion and cook until softened, about 3-5 minutes. Add the minced garlic and cook for another minute until fragrant.
- Add Ground Meat: Add the ground beef (or your chosen protein) to the skillet. Break it apart with a spoon and cook until browned, about 5-7 minutes, draining off any excess grease if necessary.
- Incorporate Peppers and Seasonings: Stir in the chopped bell peppers. Cook for 5-7 minutes, stirring occasionally, until they begin to soften. Add the Italian seasoning, smoked paprika, salt, and pepper. Stir well to combine all the flavors with the meat and vegetables.
- Add Tomato Products and Broth: Pour in the diced tomatoes (undrained) and tomato sauce. Stir to incorporate. If using uncooked rice, add the beef or chicken broth now. Stir everything together.
- Cook the Rice (if using uncooked): If you added uncooked rice in the previous step, bring the mixture to a gentle simmer. Once simmering, reduce the heat to low, cover the skillet tightly with a lid, and let it cook for 18-20 minutes, or until the rice is tender and most of the liquid has been absorbed. Avoid lifting the lid too often, as this releases steam needed for the rice to cook properly.
- Add Cooked Rice (if using): If you are using pre-cooked rice, stir it into the skillet mixture now (after the peppers have softened and tomato products are incorporated, skip step 5). Cook for another 5-7 minutes, stirring occasionally, to allow the rice to heat through and absorb some of the flavors from the sauce. You might not need all the broth if using cooked rice; add just enough to reach your desired consistency.
- Melt the Cheese: Once the rice is cooked (or heated through) and the mixture is well combined, sprinkle the shredded cheese evenly over the top.
- Finish and Serve: You have two options for melting the cheese:
- Stovetop: Cover the skillet again and cook on low heat for another 3-5 minutes, or until the cheese is melted and bubbly.
- Broiler (for oven-safe skillets): If your skillet is oven-safe, you can place it under a preheated broiler for 1-3 minutes, watching carefully to ensure the cheese melts and gets slightly golden brown but doesn’t burn.
- Garnish and Rest: Remove from heat. If desired, garnish with fresh chopped parsley or chives. Let the Stuffed Bell Pepper Skillet rest for a few minutes before serving. This allows the flavors to meld further and makes it easier to serve.
Nutrition Facts
- Servings: Approximately 6 servings
- Calories per serving: Roughly 450-550 calories (This is an estimate and can vary based on specific ingredients like fat content of meat, type of rice, and amount of cheese.)
- Protein: A good source of protein, crucial for muscle repair and satiety.
- Fiber: Contains a decent amount of fiber from the bell peppers and rice (especially if using brown rice), aiding digestion.
- Vitamin C: Bell peppers are rich in Vitamin C, an important antioxidant.
- Carbohydrates: Provides energy primarily from the rice and vegetables.
Preparation Time
- Total Preparation & Cook Time: Approximately 45-60 minutes
- Prep Time (chopping, measuring): 15-20 minutes
- Cook Time (sautéing, simmering): 30-40 minutes
This recipe is designed for efficiency, making it a fantastic option for weeknight dinners without sacrificing flavor or heartiness.
How to Serve
This Stuffed Bell Pepper Skillet is wonderfully versatile. Here are some delicious ways to serve it:
- Classic Bowl:
- Serve it hot, straight from the skillet into individual bowls.
- A dollop of sour cream or plain Greek yogurt on top adds a creamy, tangy contrast.
- A sprinkle of extra fresh parsley or cilantro for a burst of freshness.
- With a Side Salad:
- Pair it with a simple green salad tossed with a light vinaigrette to balance the richness.
- A Caesar salad would also complement it well.
- Crusty Bread Accompaniment:
- Serve with slices of warm, crusty bread (like a baguette or sourdough) for mopping up any delicious sauce left in the bowl.
- Garlic bread is an especially popular choice.
- As a Topping/Filling:
- Spoon it over baked potatoes or sweet potatoes for an extra hearty meal.
- Use it as a filling for wraps or pita pockets for a portable lunch.
- Low-Carb Options:
- Serve over cauliflower rice for a lower-carb version.
- Enjoy alongside steamed green beans or roasted broccoli.
- Garnish Extravaganza:
- Offer a small “garnish bar” with options like:
- Extra shredded cheese
- Sliced jalapeños for heat
- Chopped green onions
- A drizzle of your favorite hot sauce
- Offer a small “garnish bar” with options like:
Additional Tips
- Vary Your Veggies: Don’t feel limited to just bell peppers and onions. Finely chopped zucchini, mushrooms, corn, or even riced cauliflower can be added along with the bell peppers for extra nutrients and flavor dimensions.
- Spice It Up (or Down): Adjust the heat level to your preference. Add a pinch of red pepper flakes with the seasonings, or include a finely diced jalapeño (seeds removed for less heat) when sautéing the onions. For a milder version, ensure your paprika is sweet, not hot.
- Meat Variations: While ground beef is classic, lean ground turkey, ground chicken, or even ground pork or Italian sausage (casings removed) work wonderfully. For a vegetarian version, use plant-based crumbles, lentils, or a mix of finely chopped mushrooms and black beans.
- Rice Choices: While white rice is common, feel free to substitute brown rice for added fiber (it will require a longer cooking time and potentially more liquid if cooking from raw). Quinoa is another excellent, protein-rich alternative. Using pre-cooked or leftover rice significantly speeds up the process.
- Cheese Please: Experiment with different cheeses. Pepper Jack adds a spicy kick, mozzarella offers a great melt, a Mexican blend can add a different flavor profile, or try a sprinkle of Parmesan for a salty, nutty finish.
- Make-Ahead Magic: You can prep components in advance. Chop the vegetables and store them in an airtight container in the fridge. You can even brown the meat and sauté the onions and peppers, then cool and refrigerate. When ready to eat, simply add the remaining ingredients and simmer.
- Freezer-Friendly Meal: Allow the cooked Stuffed Bell Pepper Skillet to cool completely. Transfer to freezer-safe containers and freeze for up to 3 months. Thaw overnight in the refrigerator and reheat on the stovetop or in the microwave. You might want to add a splash of broth when reheating if it seems dry.
- Deglaze for Depth: After browning the meat and before adding the peppers, if there are browned bits stuck to the bottom of the skillet (fond), deglaze the pan with a splash of broth or even a little red wine. Scrape these bits up – they are packed with flavor!
FAQ Section
- Q: Can I make this Stuffed Bell Pepper Skillet vegetarian or vegan?
A: Absolutely! For a vegetarian version, substitute the ground meat with plant-based crumbles, cooked lentils, black beans, or a mixture of finely chopped mushrooms and walnuts. Use vegetable broth instead of beef/chicken broth. For a vegan version, follow the vegetarian modifications and use a dairy-free cheese alternative or simply omit the cheese and top with nutritional yeast for a cheesy flavor. - Q: What if I don’t have an oven-safe skillet for broiling the cheese?
A: No problem! You can simply cover the skillet with its lid after sprinkling the cheese on top and let it melt over low heat on the stovetop for 3-5 minutes. It will still be deliciously gooey. - Q: Can I use uncooked rice directly in this recipe?
A: Yes, the recipe instructions above include an option for using uncooked rice. You’ll need to add about 1 cup of broth along with the uncooked rice, bring it to a simmer, then cover and cook on low for about 18-20 minutes, or until the rice is tender and the liquid is absorbed. Using pre-cooked rice is a great time-saver, though! - Q: How do I store and reheat leftovers?
A: Store leftovers in an airtight container in the refrigerator for up to 3-4 days. Reheat gently on the stovetop over medium-low heat, adding a splash of broth or water if it seems dry, until warmed through. Alternatively, microwave individual portions until hot. - Q: Is this recipe gluten-free?
A: Yes, as long as you ensure your broth and any pre-packaged seasonings (like Italian seasoning) are certified gluten-free, this recipe is naturally gluten-free as rice is a gluten-free grain. Always double-check labels if celiac disease or severe gluten sensitivity is a concern. - Q: Can I use different types of bell peppers? Does it change the flavor?
A: Yes, you can use any color of bell pepper, or a mix! Red, yellow, and orange bell peppers are generally sweeter than green bell peppers, which have a slightly more bitter, grassy flavor. Using a variety of colors not only makes the dish more visually appealing but also adds subtle complexity to the taste. - Q: My skillet mixture seems too dry or too watery. How can I fix it?
A: If it’s too dry, especially while the rice is cooking, add a little more broth or water, a tablespoon or two at a time. If it’s too watery after the rice is cooked, remove the lid and let it simmer for a few more minutes to allow some of the excess liquid to evaporate. - Q: Can I prepare the entire dish ahead of time and then bake it later?
A: Yes, you can assemble the entire skillet dish (up to the point of adding cheese), let it cool, cover, and refrigerate for up to 24 hours. When ready to serve, reheat it gently on the stovetop until warmed through, then add the cheese and melt it either on the stovetop or under the broiler. You might need to add a little extra broth if reheating.