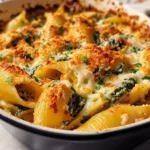
This Spinach Ricotta Pasta Shells recipe isn’t just a dish in our house; it’s an event. I remember the first time I made it, the aroma of baking cheese, garlic, and marinara filled the kitchen, drawing everyone in like a magnet. My kids, usually picky eaters, were surprisingly enthusiastic, their eyes wide as I pulled the bubbling, golden-brown casserole from the oven. My husband, a man of few words when it comes to food praise (he usually just eats!), actually said, “This is incredible, you have to make this again.” And so, it became a cherished regular, perfect for cozy Sunday dinners, impressive enough for guests, and a guaranteed way to get a chorus of “mmmms” around the table. The creamy ricotta, speckled with vibrant green spinach, all nestled into perfectly cooked pasta shells and smothered in a rich tomato sauce – it’s pure comfort food elevated. It’s the kind of meal that feels like a warm hug, and I’m thrilled to share how you can bring this little piece of our family joy into your own home.
Ingredients
- Jumbo Pasta Shells (12 oz / 340g box): These are the perfect vessel for holding the creamy filling. You’ll need about 24-30 shells.
- Whole Milk Ricotta Cheese (32 oz / 900g): The star of the filling, providing a rich, creamy texture.
- Frozen Chopped Spinach (10 oz / 280g package): Thawed and squeezed very dry to remove excess moisture.
- Grated Parmesan Cheese (1 cup / 100g, divided): Adds a salty, nutty flavor to the filling and a golden crust on top.
- Large Egg (1): Helps bind the filling ingredients together.
- Fresh Mozzarella Cheese (8 oz / 225g): Torn or sliced, for that irresistible cheesy melt on top.
- Garlic (2 cloves): Minced, for an aromatic kick in the filling.
- Fresh Parsley (1/4 cup): Chopped, for freshness and color in the filling. A little extra for garnish is nice too.
- Dried Italian Seasoning (1 teaspoon): A blend of herbs that complements the Italian flavors.
- Salt (1 teaspoon, or to taste): For seasoning the filling and pasta water.
- Black Pepper (1/2 teaspoon, or to taste): Freshly ground is best.
- Marinara Sauce (24-32 oz / 680-900g jar): Your favorite store-bought or homemade marinara sauce.
Instructions
- Preheat and Prep: Preheat your oven to 375°F (190°C). Lightly grease a 9×13 inch baking dish.
- Cook the Pasta Shells: Bring a large pot of salted water to a rolling boil. Add the jumbo pasta shells and cook according to package directions until al dente (usually about 8-10 minutes). Be careful not to overcook, as they need to be sturdy enough for stuffing. Drain the shells and rinse with cold water to stop the cooking process and prevent sticking. Set aside.
- Prepare the Spinach: While the pasta cooks, ensure your thawed spinach is very dry. Place the thawed spinach in a clean kitchen towel or several layers of paper towels and squeeze out as much liquid as possible. This step is crucial to prevent a watery filling.
- Make the Ricotta Filling: In a large bowl, combine the whole milk ricotta cheese, 3/4 cup of the grated Parmesan cheese, the beaten egg, minced garlic, chopped fresh parsley, Italian seasoning, salt, and black pepper. Add the thoroughly squeezed spinach to the bowl. Mix well until all ingredients are evenly incorporated. Taste and adjust seasoning if necessary.
- Stuff the Shells: Spread about 1 cup of marinara sauce evenly over the bottom of the prepared baking dish. This prevents the shells from sticking and adds a flavorful base. Carefully take each cooked pasta shell and gently open it. Using a small spoon or a piping bag (a zip-top bag with the corner snipped off works well), fill each shell generously with the ricotta-spinach mixture.
- Assemble the Casserole: Arrange the stuffed shells in a single layer in the baking dish, nestled closely together on top of the sauce.
- Top and Bake: Pour the remaining marinara sauce over and around the stuffed shells. Sprinkle the torn or sliced fresh mozzarella cheese evenly over the top, followed by the remaining 1/4 cup of grated Parmesan cheese.
- Bake: Cover the baking dish loosely with aluminum foil (you can tent it slightly to prevent the cheese from sticking). Bake in the preheated oven for 25 minutes. Then, remove the foil and continue baking for another 15-20 minutes, or until the sauce is bubbly, the cheese is melted and golden brown, and the shells are heated through.
- Rest and Serve: Let the Spinach Ricotta Pasta Shells rest for 5-10 minutes before serving. This allows the cheese and sauce to set slightly, making it easier to serve. Garnish with extra fresh parsley or basil, if desired.
Nutrition Facts
- Servings: Approximately 6-8 servings
- Calories per serving (approximate): 550-650 kcal (This can vary based on specific brands of cheese and sauce used.)
- Protein: Around 25-30g per serving, largely from the ricotta, Parmesan, and mozzarella cheeses, essential for muscle repair and satiety.
- Fat: Approximately 28-35g per serving, primarily from the whole milk cheeses. While providing flavor and aiding nutrient absorption, it’s good to be mindful of portion sizes.
- Carbohydrates: Roughly 45-55g per serving, mainly from the pasta shells and sugars in the marinara sauce, providing energy.
- Fiber: Around 5-7g per serving, contributed by the spinach and whole wheat pasta (if used), aiding in digestion.
Preparation Time
- Active Preparation Time: Approximately 30-40 minutes. This includes cooking the pasta, preparing the spinach, mixing the filling, and stuffing the shells.
- Cooking Time: Approximately 40-45 minutes in the oven.
- Total Time: Around 1 hour 10 minutes to 1 hour 25 minutes, plus an additional 5-10 minutes resting time before serving. This makes it a manageable dish for a weeknight if you plan accordingly, or a relaxed weekend meal.
How to Serve
Serving these Spinach Ricotta Pasta Shells is all about enhancing their comforting, cheesy goodness. Here are some delightful ways to present and accompany this dish:
- Garnishes for Visual Appeal and Freshness:
- Fresh Basil: A chiffonade of fresh basil leaves sprinkled on top just before serving adds a pop of green and a classic Italian aroma.
- Fresh Parsley: A little extra chopped fresh flat-leaf parsley offers a clean, herbaceous note.
- Red Pepper Flakes: For those who like a bit of heat, a small bowl of red pepper flakes on the side allows guests to customize their spice level.
- Extra Parmesan: Always offer a wedge of Parmesan and a grater at the table for those who desire an extra flurry of salty, nutty cheese.
- Classic Side Dish Pairings:
- Crusty Bread:
- Garlic Bread: Toasted garlic bread is a natural companion, perfect for soaking up any extra marinara sauce.
- Italian Loaf: A simple loaf of crusty Italian bread, perhaps served with a small dish of olive oil for dipping, also works beautifully.
- Salads:
- Simple Green Salad: A light, crisp green salad with a tangy vinaigrette (lemon or balsamic) provides a refreshing contrast to the richness of the pasta. Think mixed greens, cherry tomatoes, and cucumber.
- Caesar Salad: A classic Caesar salad, with its creamy dressing and crunchy croutons, is another popular choice that complements the Italian flavors.
- Arugula Salad: A peppery arugula salad with shaved Parmesan and a lemon-olive oil dressing can cut through the richness nicely.
- Crusty Bread:
- Vegetable Sides:
- Roasted Vegetables:
- Roasted Asparagus or Broccoli: Simply tossed with olive oil, salt, and pepper, and roasted until tender-crisp.
- Sautéed Green Beans: Green beans sautéed with garlic and a touch of almond slivers.
- Steamed Vegetables: Lightly steamed broccoli, zucchini, or a medley of seasonal vegetables offers a healthier, simpler side.
- Roasted Vegetables:
- Serving Style for Different Occasions:
- Family Style: Bring the entire baking dish to the table (on a trivet!) and let everyone serve themselves. It creates a warm, communal atmosphere.
- Plated: For a slightly more formal presentation, carefully plate 2-3 shells per person, spooning a little extra sauce around them and adding your chosen garnish.
- Potluck Contribution: This dish travels well (when covered) and is always a hit at potlucks. Just ensure it can be kept warm or reheated upon arrival.
- Wine Pairing (Optional):
- A medium-bodied Italian red wine like a Chianti, Sangiovese, or Barbera would complement the tomato sauce and cheese beautifully.
- For white wine drinkers, a crisp Pinot Grigio or Sauvignon Blanc can provide a refreshing counterpoint.
No matter how you choose to serve them, these Spinach Ricotta Pasta Shells are sure to be a centerpiece that gathers everyone around the table.
Additional Tips
- Don’t Overcook the Shells: Cook the pasta shells just until al dente, or even a minute less than the package directions. They will continue to cook in the oven, and slightly undercooking them helps prevent tearing while stuffing and ensures they hold their shape.
- Squeeze That Spinach Dry!: This cannot be stressed enough. Excess water from the spinach will make your ricotta filling runny and can lead to a watery sauce in the bottom of the baking dish. Use a clean kitchen towel or multiple layers of paper towels for maximum moisture extraction.
- Taste Your Filling: Before you start stuffing the shells, taste the ricotta mixture. Adjust salt, pepper, or Italian seasoning as needed. This is your last chance to perfect the flavor of the core component.
- Piping Bag for Easy Stuffing: For neater and faster stuffing, transfer the ricotta mixture to a large piping bag (or a large zip-top plastic bag with a corner snipped off). This allows for more precise placement of the filling into the shells.
- Make-Ahead Magic: You can assemble the entire dish (stuff the shells, arrange in the baking dish with sauce and cheese) up to 24 hours in advance. Cover tightly with plastic wrap and refrigerate. When ready to bake, remove from the fridge about 30 minutes before to let it come closer to room temperature, then bake as directed, possibly adding 10-15 minutes to the covered baking time.
- Freezer-Friendly Meal: These stuffed shells freeze beautifully. Assemble the dish in a freezer-safe baking dish, but don’t bake it. Cover tightly with plastic wrap, then a layer of aluminum foil. Freeze for up to 3 months. To bake, you can thaw overnight in the refrigerator and bake as directed (adding extra time), or bake from frozen (cover with foil and bake for about 1-1.5 hours, then uncover and bake until bubbly and golden).
- Sauce Variations: While classic marinara is fantastic, feel free to experiment. A robust arrabbiata sauce can add a spicy kick, a creamy tomato rosa sauce offers extra richness, or even a quality store-bought vodka sauce would be delicious. You can also add sautéed mushrooms or onions to your marinara for extra depth.
- Boost the Flavor with Fresh Herbs: While the recipe calls for dried Italian seasoning and fresh parsley, incorporating other fresh herbs like finely chopped fresh basil or a pinch of fresh oregano into the ricotta mixture can elevate the flavor profile even further.
FAQ Section
Q1: Can I use fresh spinach instead of frozen?
A1: Absolutely! If using fresh spinach, you’ll need about 1 to 1.5 pounds. Sauté or steam it until wilted, then let it cool. Once cooled, chop it finely and, most importantly, squeeze out all excess moisture just as you would with frozen spinach. The key is removing that water content.
Q2: What if I can’t find jumbo pasta shells? Can I use other pasta shapes?
A2: If jumbo shells aren’t available, large manicotti tubes are the best alternative as they are also designed for stuffing. Cannelloni tubes work too. In a pinch, you could layer the ricotta mixture with lasagna noodles and sauce for a similar flavor profile in a lasagna format, or even mix the filling with cooked medium shells or ziti and bake as a casserole.
Q3: How do I prevent the pasta shells from tearing while stuffing?
A3: Cook the shells just until al dente, or even a minute shy, so they retain some firmness. Rinse them with cold water immediately after draining to stop the cooking and cool them down for easier handling. Be gentle when opening and filling them. If a few tear, don’t worry – they’ll still taste delicious, or you can use them to patch any gaps in your baking dish.
Q4: Can I make this recipe gluten-free?
A4: Yes, you can adapt this recipe to be gluten-free by using gluten-free jumbo pasta shells or manicotti. Ensure your marinara sauce is also certified gluten-free. The other ingredients are naturally gluten-free, but always double-check labels if cross-contamination is a concern.
Q5: What’s the best way to store and reheat leftovers?
A5: Store leftover Spinach Ricotta Pasta Shells in an airtight container in the refrigerator for up to 3-4 days. To reheat, you can microwave individual portions until heated through. For larger amounts, place them in an oven-safe dish, cover with foil, and bake at 350°F (175°C) for about 20-25 minutes, or until warmed through. Removing the foil for the last 5 minutes can help re-crisp the cheese.
Q6: Can I add meat to the filling for extra protein?
A6: Yes, this recipe is very adaptable! Cooked and crumbled Italian sausage (sweet or spicy), ground beef, or even finely chopped cooked chicken would be delicious additions to the ricotta mixture. If adding meat, ensure it’s cooked through and drained of any excess fat before mixing it into the filling. You might want to slightly reduce the amount of spinach to accommodate the meat.
Q7: My ricotta filling sometimes seems a bit bland. How can I boost its flavor?
A7: Besides tasting and adjusting salt and pepper, ensure your garlic is fresh and finely minced. Using good quality Parmesan cheese makes a big difference. A pinch of nutmeg (just a tiny bit) is a classic addition to ricotta fillings and enhances its creamy flavor. You can also add a zest of one lemon for a brighter note or a pinch of red pepper flakes for a subtle kick directly into the filling.
Q8: Is it necessary to put sauce on the bottom of the baking dish?
A8: Yes, it’s highly recommended. The layer of marinara sauce on the bottom of the dish serves two purposes: it prevents the pasta shells from sticking to the dish during baking, and it ensures the bottom of the shells absorbs some sauce, adding flavor and moisture throughout the entire dish. Without it, the bottoms might become dry or even burn.