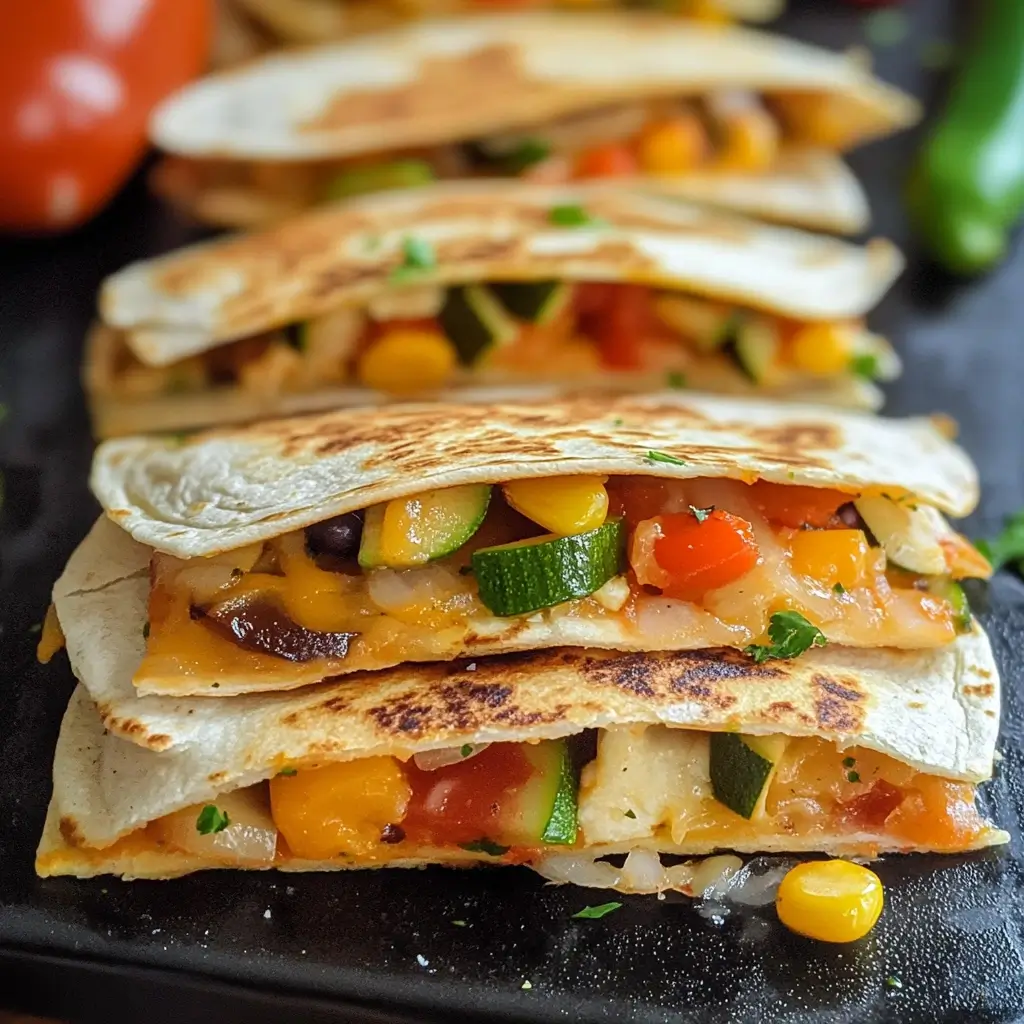
Our household has a recurring dinnertime dilemma: finding something quick, healthy, and appealing to everyone, especially the kids. After countless experiments, I stumbled upon the magic of Mini Veggie Quesadillas. The first time I made them, my youngest, usually a staunch veggie-avoider, actually asked for seconds! My partner loved how easily they could be customized with different dips, and I was thrilled to find a simple way to pack a nutritional punch into a fun, handheld meal. These little pockets of joy have since become a weekly staple, perfect for busy weeknights, lazy weekend lunches, or even as a crowd-pleasing appetizer when friends come over. They’re a testament to the fact that delicious and wholesome don’t have to be complicated. The vibrant colors of the vegetables, the ooey-gooey melted cheese, and the slightly crisp tortilla make for an irresistible combination that never fails to satisfy.
Ingredients
- 1 tablespoon Olive Oil or Avocado Oil: For sautéing the vegetables, providing a healthy fat base.
- 1 medium Red Onion (approx. 1/2 cup, finely chopped): Adds a sweet and savory aromatic foundation.
- 1 Red Bell Pepper (approx. 1 cup, finely chopped): Lends sweetness, vibrant color, and Vitamin C.
- 1 Yellow or Orange Bell Pepper (approx. 1 cup, finely chopped): Adds more sweetness, color contrast, and nutrients.
- 1 medium Zucchini (approx. 1 cup, finely chopped): Provides a mild flavor, good texture, and bulks up the veggie content.
- 1/2 cup Corn Kernels (fresh or frozen, thawed): Adds a pop of sweetness and texture.
- 1/2 cup Black Beans (canned, rinsed and drained, or cooked from scratch): Offers plant-based protein and fiber.
- 1 teaspoon Ground Cumin: Imparts a warm, earthy, and classic Tex-Mex flavor.
- 1/2 teaspoon Chili Powder (mild): Adds a gentle warmth and depth of flavor; adjust to your spice preference.
- 1/4 teaspoon Dried Oregano: Contributes a subtle herbaceous note.
- Salt, to taste (approx. 1/4 to 1/2 teaspoon): Enhances all the flavors.
- Freshly Ground Black Pepper, to taste (approx. 1/4 teaspoon): Adds a hint of spice.
- 12-16 Small (6-inch) Flour or Corn Tortillas: The vessel for our delicious filling. Corn tortillas offer a more traditional flavor, while flour tortillas are often softer and more pliable.
- 1.5 – 2 cups Shredded Cheese (Monterey Jack, Cheddar, Colby Jack, or a Mexican blend): The glorious melting agent that binds everything together.
- Optional: 1-2 tablespoons chopped Fresh Cilantro: For a burst of freshness, stirred into the veggie mixture or sprinkled on top.
Instructions
- Prepare the Vegetables: Begin by thoroughly washing all your fresh vegetables. Finely chop the red onion, red bell pepper, yellow/orange bell pepper, and zucchini into small, uniform pieces (about 1/4 to 1/2 inch dice). This ensures they cook evenly and fit nicely into the mini quesadillas. If using fresh corn, cut the kernels off the cob. If using frozen corn, ensure it’s thawed. Rinse and drain the canned black beans thoroughly to remove excess sodium.
- Sauté the Aromatics and Harder Vegetables: Heat the olive oil or avocado oil in a large skillet or pan over medium heat. Once the oil is shimmering, add the chopped red onion and sauté for 2-3 minutes until it begins to soften and become translucent. Add the chopped bell peppers to the skillet. Continue to cook, stirring occasionally, for another 4-5 minutes until the peppers start to soften.
- Add Remaining Vegetables and Spices: Add the finely chopped zucchini and corn kernels to the skillet. Cook for another 3-4 minutes, stirring frequently, until the zucchini is tender-crisp. You don’t want it to become mushy. Stir in the rinsed and drained black beans.
- Season the Filling: Add the ground cumin, chili powder, dried oregano, salt, and freshly ground black pepper to the vegetable mixture. Stir well to ensure all the vegetables are evenly coated with the spices. Cook for another 1-2 minutes, allowing the spices to bloom and meld with the vegetables. Taste the mixture and adjust seasonings if necessary. If using, stir in the chopped fresh cilantro at this stage. Remove the skillet from the heat and set the vegetable filling aside.
- Assemble the Quesadillas: Lay out your small tortillas on a clean work surface. There are two main ways to assemble mini quesadillas:
- Fold-Over Method (Half-Moons): Sprinkle about 1-2 tablespoons of shredded cheese over one half of each tortilla. Spoon about 2-3 tablespoons of the vegetable filling evenly over the cheese. Sprinkle another tablespoon of cheese on top of the veggies. Fold the other half of the tortilla over the filling to create a half-moon shape. Gently press down.
- Stacked Method (Full Mini Rounds): If using very small tortillas (e.g., street taco size), you can make full rounds. Sprinkle one tortilla lightly with cheese, top with a thin layer of veggie filling, another sprinkle of cheese, and then place a second tortilla on top. This method works best with 4-inch tortillas. For 6-inch tortillas, the fold-over method is generally easier to manage.
- Cook the Quesadillas: You can cook the quesadillas in a clean, dry skillet (the same one you used for the veggies, wiped clean if necessary), a griddle, or a panini press.
- Skillet/Griddle Method: Heat the skillet or griddle over medium to medium-low heat. You don’t want the heat too high, or the tortillas will burn before the cheese melts. Place 1-3 quesadillas in the hot skillet, depending on its size, ensuring not to overcrowd the pan. Cook for 2-4 minutes per side, or until the tortilla is golden brown and crispy, and the cheese is completely melted and bubbly. Use a spatula to carefully flip the quesadillas.
- Panini Press Method: Preheat your panini press. Place the assembled quesadillas on the press and close the lid. Cook for 3-5 minutes, or until golden brown and the cheese is melted.
- Rest and Serve: Once cooked, transfer the mini quesadillas to a cutting board. Let them rest for a minute or two before cutting (if using the fold-over method, you can cut them into smaller wedges, or serve them whole). This helps the cheese set slightly and prevents the filling from oozing out too much. Serve immediately with your favorite dips and garnishes.
Nutrition Facts
- Servings: This recipe typically yields 6-8 servings (assuming 2 mini quesadillas per serving).
- Calories per serving (approximate for 2 mini quesadillas): 280-350 calories, largely dependent on the type and amount of cheese and tortillas used.
- Protein: Approximately 10-15g per serving, primarily from the cheese and black beans, contributing to satiety and muscle maintenance.
- Fiber: Approximately 5-8g per serving, thanks to the abundance of vegetables and black beans, aiding digestion and promoting fullness.
- Vitamin C: Rich in Vitamin C, especially from the bell peppers, which supports immune function and acts as an antioxidant.
- Complex Carbohydrates: Provides sustained energy from the tortillas and vegetables, rather than a quick sugar spike.
Preparation Time
- Chopping and Vegetable Preparation: Approximately 15-20 minutes. This is the most hands-on part of the recipe. Efficient chopping skills can reduce this time.
- Sautéing Vegetable Filling: Approximately 10-15 minutes. This allows the vegetables to cook through and the flavors to meld.
- Assembling and Cooking Quesadillas: Approximately 15-20 minutes, depending on how many you cook at once and your cooking method.
- Total Estimated Time: Around 40-55 minutes from start to finish, making it a relatively quick option for a flavorful meal or snack.
How to Serve
Mini Veggie Quesadillas are wonderfully versatile. Here are some fantastic ways to serve them:
- With Classic Dips:
- Salsa: A non-negotiable for many! Offer a variety like:
- Pico de Gallo: Fresh, chunky, and vibrant.
- Salsa Roja: A smooth, cooked tomato-based salsa.
- Salsa Verde: Tangy and bright, made with tomatillos.
- Corn and Black Bean Salsa: Adds even more texture and flavor.
- Guacamole: Creamy, rich, and packed with healthy fats. Homemade is best, but good quality store-bought works too.
- Sour Cream or Plain Greek Yogurt: Adds a cool, tangy counterpoint to the warm quesadillas. Greek yogurt is a healthier, protein-rich alternative.
- Chipotle Crema: Mix sour cream or Greek yogurt with a bit of adobo sauce from canned chipotle peppers and a squeeze of lime juice for a smoky, spicy kick.
- Cilantro Lime Crema/Sauce: Blend fresh cilantro, lime juice, a touch of garlic, and sour cream or Greek yogurt for a zesty, herby dip.
- Salsa: A non-negotiable for many! Offer a variety like:
- As a Main Course Component:
- Alongside a Fresh Salad: A simple green salad with a light vinaigrette, or a more substantial Southwestern salad with romaine, corn, black beans, and a creamy avocado dressing.
- With Mexican Rice or Cilantro-Lime Rice: Makes for a more filling and complete meal.
- Paired with Refried Beans or Seasoned Black Beans: Adds extra protein and fiber.
- For Different Occasions:
- Appetizers for Parties: Their mini size makes them perfect finger food. Arrange them on a platter with a variety of dips in the center.
- Kid-Friendly Lunch or Dinner: Cut them into fun shapes or smaller wedges. Kids love having their own “mini pizzas.”
- Packed Lunchbox Treat: They hold up reasonably well and can be eaten at room temperature, though they are best when warm.
- Quick Weeknight Meal: When you’re short on time but want something satisfying and relatively healthy.
- After-School Snack: A more substantial and nutritious option than chips or cookies.
- Garnishes:
- A sprinkle of fresh chopped cilantro or thinly sliced green onions.
- A dollop of your favorite dip directly on top.
- A few slices of pickled jalapeños for those who like extra heat.
Additional Tips
- Master the Veggie Dice: Uniformly dicing your vegetables into small pieces (around 1/4-inch) is key. This ensures they cook evenly, fit neatly into the mini tortillas without tearing them, and provide a pleasant texture in every bite. Larger chunks can make the quesadillas bulky and difficult to eat.
- Don’t Overstuff: While it’s tempting to load up on the delicious filling, overstuffing can lead to tortillas tearing during assembly or cooking, and the filling oozing out messily. A moderate layer of cheese and veggies is perfect.
- Cheese Choices Matter: While pre-shredded cheese is convenient, grating your own block cheese often results in better meltability as it doesn’t contain anti-caking agents. Experiment with blends! A mix of Monterey Jack (for meltiness) and Cheddar (for flavor) is classic. Pepper Jack adds a nice kick.
- Pre-cook the Veggies Thoroughly: Sautéing the vegetables until they are tender-crisp is crucial. If you add raw or undercooked hard vegetables to the quesadilla, they won’t cook enough during the short grilling time and will result in a crunchy, unappetizing texture.
- Control the Heat: Cook quesadillas over medium to medium-low heat. If the heat is too high, the tortillas will brown or even burn before the cheese has a chance to melt completely and the filling gets warm. Patience is key for that perfect golden crust and gooey center.
- Make-Ahead Filling: The vegetable filling can be made a day or two in advance and stored in an airtight container in the refrigerator. This significantly cuts down on prep time when you’re ready to assemble and cook the quesadillas, making it an excellent option for quick weeknight meals.
- Batch Cooking and Freezing: If you’re making a large batch, you can keep cooked quesadillas warm in a low oven (around 200°F or 90°C) on a baking sheet while you finish cooking the rest. For freezing, see the FAQ section for detailed instructions.
- Get Creative with Add-Ins: Don’t be afraid to customize! Add sautéed mushrooms, spinach (wilted and squeezed dry), finely chopped jalapeños for heat, or even leftover cooked chicken or seasoned ground meat if you want to add non-veggie protein. Different beans like pinto beans also work well.
FAQ Section
Q1: Can I make these Mini Veggie Quesadillas gluten-free?
A1: Absolutely! The easiest way to make them gluten-free is to use 100% corn tortillas. Ensure they are certified gluten-free if catering to someone with celiac disease. The vegetable filling and cheese are naturally gluten-free, but always double-check labels on packaged seasonings or pre-shredded cheese if cross-contamination is a concern.
Q2: How can I make these quesadillas vegan?
A2: Yes, it’s quite simple to adapt this recipe for a vegan diet. Use your favorite brand of dairy-free shredded cheese (vegan cheddar, mozzarella, or pepper jack style shreds work well). Ensure your tortillas are vegan (most corn and many flour tortillas are, but check ingredients for lard or dairy). Serve with vegan sour cream (cashew or tofu-based), guacamole, and salsa.
Q3: What’s the best way to store leftover Mini Veggie Quesadillas?
A3: Allow the leftover quesadillas to cool completely to room temperature. Then, store them in an airtight container in the refrigerator. They will keep well for up to 3-4 days. Stacking them with a small piece of parchment paper in between can prevent them from sticking together.
Q4: Can I freeze Mini Veggie Quesadillas? If so, how?
A4: Yes, they freeze surprisingly well!
* Freezing Cooked Quesadillas: Let them cool completely. You can wrap them individually in plastic wrap or foil, then place them in a freezer-safe bag or container.
* Freezing Uncooked Assembled Quesadillas: Assemble the quesadillas but don’t cook them. Place them on a baking sheet lined with parchment paper in a single layer and freeze until solid (about 1-2 hours). Then, transfer them to a freezer-safe bag or container. This method often yields better results upon reheating.
* They can be frozen for up to 2-3 months. To reheat, you can thaw them in the refrigerator overnight or cook/reheat directly from frozen in a skillet over medium-low heat, in the oven, or in an air fryer until heated through and crispy.
Q5: What are the best types of vegetables to use, and can I use others?
A5: The recipe calls for bell peppers, onion, zucchini, and corn, which are great because they sauté well and offer good flavor and texture. However, feel free to experiment! Other excellent choices include:
* Mushrooms (cremini, shiitake, button), sliced and sautéed.
* Spinach or kale (wilted and squeezed of excess moisture).
* Sweet potatoes (cooked and diced small).
* Broccoli florets (blanched and finely chopped).
* Carrots (shredded or finely diced and sautéed).
The key is to ensure any harder vegetables are pre-cooked or finely chopped so they become tender.
Q6: How do I get my quesadillas extra crispy?
A6: For extra crispy quesadillas:
* Use enough fat: A thin layer of oil or butter in the pan helps. Some people even lightly brush the outside of the tortillas with melted butter or oil before cooking.
* Don’t overcrowd the pan: This lowers the pan temperature and can lead to steaming rather than crisping.
* Medium heat: Avoid high heat which burns the outside quickly. Medium heat allows the tortilla to gradually crisp up as the cheese melts.
* Cast iron skillet: If you have one, a cast iron skillet retains and distributes heat very well, leading to excellent browning and crisping.
* Press down lightly: Use a spatula to gently press the quesadilla as it cooks. This increases contact with the hot pan.
Q7: Can I prepare the vegetable filling ahead of time?
A7: Yes, absolutely! The vegetable filling can be prepared 1-2 days in advance. Sauté the vegetables as directed, let the mixture cool completely, and then store it in an airtight container in the refrigerator. When you’re ready to make the quesadillas, simply assemble them with the pre-made filling and cheese, then cook. This is a fantastic time-saver for busy days.
Q8: Are Mini Veggie Quesadillas a healthy option?
A8: Yes, they can be a very healthy option, especially when made thoughtfully! They are packed with a variety of vegetables, providing vitamins, minerals, and fiber. Using whole wheat or corn tortillas can increase fiber content. Black beans add plant-based protein and more fiber. Portion control and the amount/type of cheese used will influence the overall calorie and fat content. Opting for lighter dips like salsa or Greek yogurt instead of full-fat sour cream can also enhance their health profile. They are certainly a more nutritious choice than many processed snacks or fast-food options.