
Our household is always on the hunt for quick, delicious, and reasonably healthy meal options, especially on those chaotic weeknights. When I first stumbled upon the idea of Mini Veggie Pita Pizzas, I was intrigued but slightly skeptical. Could something so simple truly satisfy our pizza cravings? The answer, my friends, was a resounding YES! The first time I made these, my kids, who can be notoriously picky about vegetables, actually asked for seconds. My husband loved how customizable they were, and I was thrilled with the minimal prep and cleanup. These little pita powerhouses quickly became a staple, perfect for a speedy dinner, a fun lunch, or even a crowd-pleasing appetizer. They are vibrant, flavorful, and endlessly adaptable, making them a true winner in my recipe book. The sheer joy of watching everyone happily munching on their personalized mini pizzas, packed with colorful veggies, is a reward in itself.
Ingredients
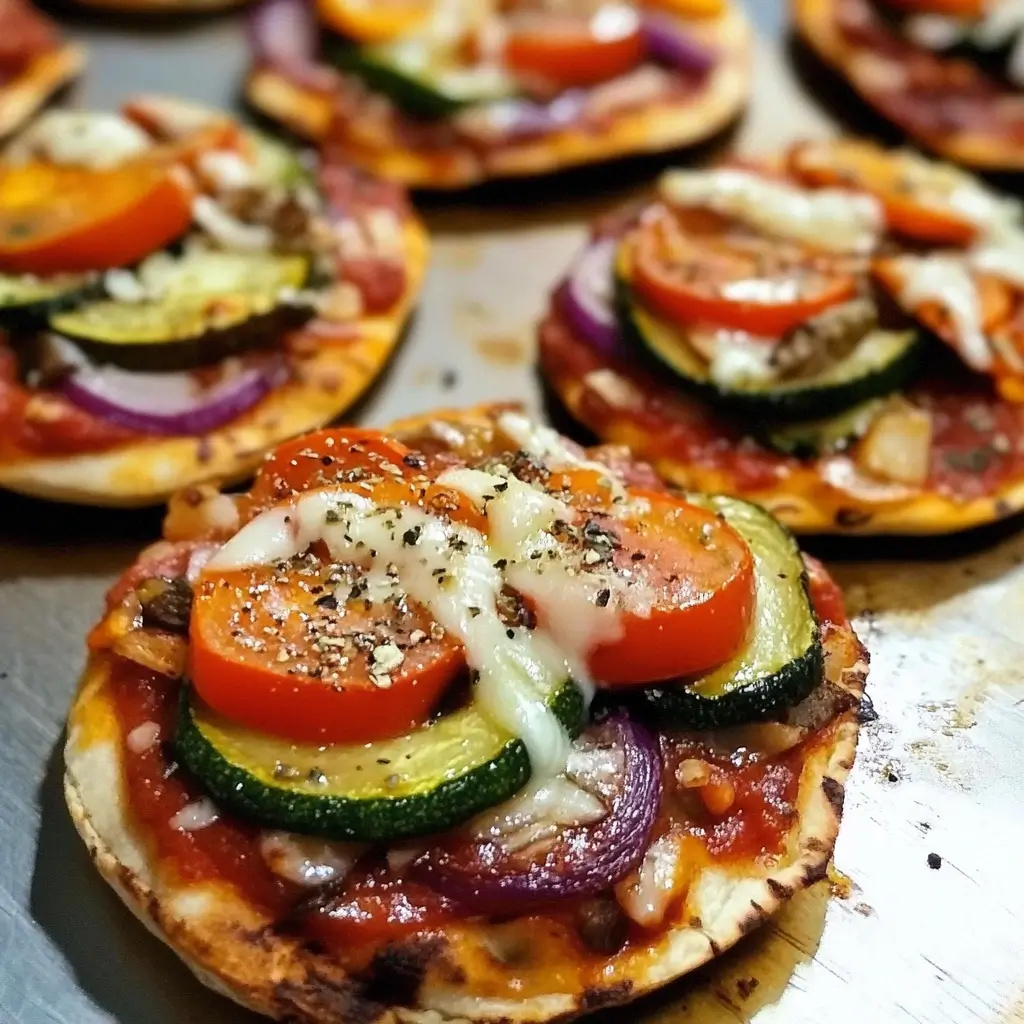
Here’s what you’ll need to create these delightful mini veggie pita pizzas:
- 4 Whole Wheat Pita Breads (6-inch): The base of our pizzas. Whole wheat adds a lovely nutty flavor and extra fiber. You can also use white pita bread if preferred.
- 1/2 cup Pizza Sauce (or Marinara Sauce): Choose your favorite store-bought brand or use a homemade version for extra love.
- 1 cup Shredded Mozzarella Cheese: The classic pizza cheese, melts beautifully. A low-moisture variety works best.
- 1/4 cup Bell Pepper, finely diced (any color): Adds sweetness and a lovely crunch. We love a mix of red, yellow, and orange for color.
- 1/4 cup Red Onion, thinly sliced or finely diced: Provides a pungent kick and beautiful color contrast.
- 1/4 cup Cherry Tomatoes, halved or quartered: Bursts of juicy sweetness that complement the savory flavors.
- 1/4 cup Black Olives, sliced: For that classic salty, briny pizza flavor.
- 2 tablespoons Fresh Basil, chopped (optional, for garnish): Adds a touch of freshness and an aromatic finish.
- 1 tablespoon Olive Oil (optional, for brushing pitas): Helps create a crispier crust.
- Pinch of Dried Oregano or Italian Seasoning (optional): Enhances the classic pizza aroma and taste.
Instructions
Follow these simple steps to pizza perfection:
- Preheat Oven & Prepare Baking Sheet: Preheat your oven to 400°F (200°C). Line a large baking sheet with parchment paper for easy cleanup. This also prevents the pitas from sticking.
- Prepare the Pitas: If using, lightly brush one side of each pita bread with olive oil. This side will be the bottom, helping it to crisp up. Place the pita breads, oil-side down (if using), on the prepared baking sheet.
- Sauce ‘Em Up: Spread a thin, even layer of pizza sauce over the top surface of each pita bread, leaving a small border around the edge for the “crust.” About 2 tablespoons per pita is usually a good amount, but adjust to your preference.
- Cheese, Please: Sprinkle the shredded mozzarella cheese generously over the sauce on each pita. Ensure even coverage for maximum cheesy goodness.
- Veggie Power: Distribute your chosen vegetables – diced bell peppers, red onion, cherry tomatoes, and sliced black olives – evenly over the cheese. Don’t overcrowd the pitas, as this can make them soggy.
- Seasoning Touch (Optional): If desired, sprinkle a pinch of dried oregano or Italian seasoning over the toppings for an extra layer of flavor.
- Bake to Perfection: Place the baking sheet in the preheated oven. Bake for 10-15 minutes, or until the cheese is melted, bubbly, and slightly golden, and the pita edges are crispy. Keep a close eye on them, as oven times can vary.
- Garnish and Serve: Carefully remove the baking sheet from the oven. If using, sprinkle the freshly chopped basil over the hot mini pizzas. Let them cool for a minute or two before slicing (if desired) and serving.
Nutrition Facts
- Servings: 4 mini pizzas (1 pita pizza per serving)
- Calories per serving (approximate): 280-350 kcal (This can vary significantly based on the specific brands of pita, sauce, cheese, and the exact amount of toppings used.)
- Protein: Approximately 15-20g. Primarily from the cheese and whole wheat pita, essential for muscle repair and satiety.
- Fiber: Approximately 5-8g. Largely from the whole wheat pita and vegetables, aiding digestion and promoting fullness.
- Vitamins & Minerals: A good source of Vitamin C (from bell peppers and tomatoes) and Calcium (from cheese). The variety of vegetables contributes a range of micronutrients.
- Healthy Fats (if using olive oil and olives): Provides monounsaturated fats, beneficial for heart health.
(Note: These are estimates. For precise nutritional information, it’s best to use a nutrition calculator with your specific ingredients and quantities.)
Preparation Time
- Prep Time: 10-15 minutes. This includes chopping the vegetables and assembling the pizzas. If you buy pre-chopped veggies, you can cut this down even further!
- Cook Time: 10-15 minutes. The time it takes for the cheese to melt and the pita to crisp up in the oven.
- Total Time: Approximately 20-30 minutes from start to finish, making this an incredibly efficient meal option.
The Enduring Appeal of Mini Veggie Pita Pizzas
There’s an undeniable charm to mini foods, and when combined with the universal love for pizza, you get a culinary match made in heaven. Mini Veggie Pita Pizzas are more than just a scaled-down version of their larger counterparts; they are a distinct culinary experience. Their appeal lies in their simplicity, speed, and incredible versatility.
For busy families, they represent a lifeline – a way to get a wholesome, satisfying meal on the table in under 30 minutes. The individual serving size also means less food waste and built-in portion control, which is a boon for health-conscious individuals. Children adore them because they are fun to eat and even more fun to help make. Allowing kids to choose their own toppings can be a fantastic way to encourage them to try new vegetables.
Beyond the practical benefits, these pita pizzas tap into our desire for comfort food without the usual guilt. By using whole wheat pitas and piling on the fresh vegetables, you’re creating a meal that is both comforting and nourishing. They are a testament to the fact that healthy eating doesn’t have to be complicated or bland. The vibrant colors of the bell peppers, tomatoes, and onions, contrasted against the melted mozzarella, make them visually appealing, proving that we eat with our eyes first. Whether it’s a quick weeknight dinner, a fun lunchbox addition, an after-school snack, or even a casual party appetizer, these mini veggie pita pizzas consistently deliver on flavor, convenience, and satisfaction.
Choosing Your Ingredients Wisely
The beauty of this recipe lies in its simplicity, but the quality of your ingredients can elevate it from good to great.
- Pita Bread: The foundation of your pizza!
- Whole Wheat vs. White: Whole wheat pitas offer more fiber and a nuttier, more complex flavor. White pitas are softer and milder. Both work well, so it’s a matter of preference.
- Thickness: Thicker pitas will result in a softer, chewier crust, while thinner pitas will crisp up more.
- Pocket vs. Pocketless: Either can be used. If using pocket pitas, you’re just using one side as the base. Some find pocketless pitas (often labeled as “Greek pita” or “flatbreads”) sturdier.
- Pizza Sauce:
- Store-Bought: Look for brands with minimal added sugar and recognizable ingredients. Marinara sauce is a great alternative if you prefer a slightly less intense tomato flavor.
- Homemade: If you have the time, a simple homemade sauce made from crushed tomatoes, garlic, oregano, and a touch of olive oil can be fantastic.
- Cheese:
- Mozzarella: Low-moisture, part-skim mozzarella is the go-to for its excellent melting properties and classic pizza taste. Fresh mozzarella can be used, but it releases more water, so use it sparingly or pat it dry.
- Other Cheeses: Feel free to experiment! A sprinkle of Parmesan adds a salty kick, provolone offers a sharper flavor, and a Monterey Jack or cheddar blend can be delicious.
- Vegetables:
- Freshness is Key: Use the freshest vegetables you can find for the best flavor and texture.
- Prepping: Dice or slice vegetables relatively thinly and uniformly so they cook evenly and don’t overload the pita.
- Variety: Don’t limit yourself to the recipe! Mushrooms, zucchini, spinach (wilted slightly beforehand), corn, and artichoke hearts are all excellent additions.
How to Serve
These Mini Veggie Pita Pizzas are incredibly versatile and can be served in various ways:
- As a Main Course:
- Serve 1-2 pita pizzas per person.
- Pair with a Simple Side Salad: A fresh green salad with a light vinaigrette complements the richness of the pizza perfectly. Think mixed greens, cucumber, and a sprinkle of feta.
- With a Side of Soup: A light vegetable soup or a creamy tomato soup makes for a comforting and complete meal.
- Fruit Platter: For a lighter accompaniment, especially for lunch, serve with a colorful platter of fresh fruit.
- As an Appetizer or Party Food:
- Slice each mini pita pizza into 4 wedges for easy-to-grab, bite-sized pieces.
- Arrange them attractively on a platter.
- Serve with Dips: Offer a side of marinara sauce for extra dipping, or even a garlic aioli or a light ranch dressing.
- For Lunchboxes:
- Let them cool completely before packing to prevent sogginess.
- They are delicious eaten cold or can be quickly reheated in a microwave or toaster oven if facilities are available.
- Garnish Options:
- Fresh Herbs: Besides basil, fresh oregano or parsley can add a nice touch.
- Red Pepper Flakes: For those who like a bit of heat.
- A Drizzle of Quality Olive Oil: Just before serving for extra richness and shine.
- A Sprinkle of Parmesan Cheese: For an extra salty, umami kick.
Beyond the Basics: Customizing Your Pita Pizzas
One of the greatest joys of this recipe is its adaptability. Think of the pita as your canvas!
- Sauce Swaps:
- Pesto: A vibrant green pesto base offers a completely different, herby flavor profile. Pairs wonderfully with chicken (if adding protein), tomatoes, and mozzarella.
- BBQ Sauce: For a tangy, smoky twist. Great with chicken, red onion, and perhaps some pineapple for a Hawaiian BBQ vibe.
- Alfredo Sauce: A creamy white sauce base can be decadent. Try it with spinach, mushrooms, and grilled chicken.
- Hummus: For a Mediterranean flair, spread a layer of hummus before adding veggies like roasted red peppers, feta, and olives.
- Cheese Adventures:
- Feta: Crumbled feta adds a salty, tangy punch, especially good with Mediterranean-style toppings.
- Goat Cheese: Creamy and tangy, it pairs well with roasted vegetables like bell peppers or caramelized onions.
- Provolone: Offers a slightly sharper, more complex flavor than mozzarella.
- Vegan Cheese: There are many excellent dairy-free mozzarella alternatives available for a plant-based version.
- Protein Power-Ups (for non-veggie versions or for meat-eaters in the family):
- Cooked Chicken: Shredded rotisserie chicken or diced cooked chicken breast.
- Pepperoni or Salami: Classic pizza toppings.
- Cooked Sausage: Crumbled Italian sausage or chorizo.
- Plant-Based Proteins: Crumbled tofu or tempeh, seasoned well, can be great additions. Cooked lentils or chickpeas can also add substance.
- Vegetable Variations Galore:
- Mushrooms: Sliced cremini, shiitake, or button mushrooms.
- Zucchini or Yellow Squash: Thinly sliced.
- Spinach or Kale: Wilt fresh spinach or kale by sautéing it briefly before adding to the pizza, or use frozen (thawed and squeezed dry).
- Artichoke Hearts: Canned or jarred, drained and roughly chopped.
- Caramelized Onions: Adds a deep, sweet flavor.
- Roasted Vegetables: Leftover roasted veggies like broccoli, cauliflower, or eggplant are fantastic.
- Jalapeños or Banana Peppers: For a spicy kick.
- Themed Pizzas:
- Mediterranean: Hummus or tomato sauce base, feta, olives, red onion, cucumber (added after baking), and a sprinkle of dill.
- Mexican-Inspired: Salsa as a base, black beans, corn, bell peppers, jalapeños, cheddar or Monterey Jack cheese, topped with cilantro and a dollop of sour cream or guacamole after baking.
- Caprese: Sliced fresh mozzarella, cherry tomatoes, and fresh basil (add basil after baking). A drizzle of balsamic glaze would be perfect.
Additional Tips
Make your Mini Veggie Pita Pizza experience even better with these handy tips:
- Crispier Crust Secret: For an extra crispy crust, pre-bake the pita breads (with or without olive oil) for 2-3 minutes directly on the oven rack before adding toppings. Then, proceed with sauce and toppings and bake as directed.
- Don’t Overload: It can be tempting to pile on the toppings, but overloading can lead to a soggy pita and uneven cooking. A single, even layer of toppings is best.
- Manage Moisture: If using very watery vegetables (like fresh tomatoes that are extra juicy or fresh mozzarella), you might want to pat them dry with a paper towel before adding them to prevent the pita from becoming soggy.
- Get Kids Involved: This is a fantastic recipe for kids to help with. Let them spread the sauce, sprinkle the cheese, and arrange their favorite (approved) veggies. They’re more likely to eat what they help make!
- Make-Ahead Components: Chop your vegetables a day or two in advance and store them in an airtight container in the refrigerator. This makes assembly even quicker on busy nights.
- Storage and Reheating: Store leftover pita pizzas in an airtight container in the refrigerator for up to 2-3 days. Reheat in a toaster oven, air fryer, or conventional oven at 350°F (175°C) for 5-7 minutes until warmed through and crispy. Microwaving will make them soft.
- Freezing (Uncooked): You can assemble the pita pizzas (sauce, cheese, veggies) on a baking sheet, freeze them until solid, then transfer them to freezer-safe bags or containers. Bake from frozen, adding a few extra minutes to the cooking time. This is great for meal prep.
- Broil for Bubbly Cheese (Caution!): If you like your cheese extra bubbly and slightly browned, you can switch the oven to broil for the last 1-2 minutes of cooking. Watch VERY carefully as toppings and pitas can burn quickly under the broiler.
FAQ Section
Q1: Can I use gluten-free pita bread for this recipe?
A1: Absolutely! Gluten-free pita breads are widely available and work wonderfully as a base for these mini pizzas. Baking times might vary slightly, so keep an eye on them.
Q2: How can I make these Mini Veggie Pita Pizzas vegan?
A2: Easily! Use your favorite plant-based mozzarella-style shreds. Ensure your pizza sauce is vegan (most are, but always check labels). Then load up on all the delicious veggies.
Q3: My pita pizzas always turn out soggy. What am I doing wrong?
A3: Sogginess can be caused by a few things: too much sauce, overly moist toppings, or overcrowding the pita. Try using a thinner layer of sauce, patting moist vegetables dry, not overloading toppings, and pre-baking the pita for a few minutes as suggested in the tips.
Q4: Can I make these on the grill?
A4: Yes, pita pizzas are fantastic on the grill! Preheat your grill to medium heat. Lightly oil the grates. Assemble the pizzas and grill them with the lid closed for about 5-8 minutes, or until the cheese is melted and the bottom is crispy. Keep a close eye as they cook quickly.
Q5: What are some low-carb alternatives to pita bread for this recipe?
A5: For a lower-carb version, you could use large portobello mushroom caps (scoop out the gills), thick slices of eggplant (grill or roast them slightly first), or cauliflower pizza crusts cut into smaller rounds.
Q6: Can I use different types of sauces besides traditional pizza sauce?
A6: Definitely! As mentioned in the customization section, pesto, BBQ sauce, Alfredo sauce, or even a thin layer of hummus can create exciting flavor variations.
Q7: Are these pita pizzas suitable for meal prepping for lunches?
A7: Yes, they are excellent for meal prep. Bake them, let them cool completely, and then store them in individual containers in the refrigerator. They can be eaten cold or reheated. Consider packing very watery toppings (like fresh tomato slices) separately if you’re worried about texture over several days.
Q8: My kids are picky eaters. Any tips for getting them to eat the veggies on these pizzas?
A8: Get them involved in making their own pizzas! Let them choose from a selection of finely diced, colorful vegetables. Sometimes, arranging veggies into a smiley face or a simple pattern can make it more fun. Start with milder veggies like bell peppers and gradually introduce others. You can also “hide” some finely chopped veggies under the cheese.