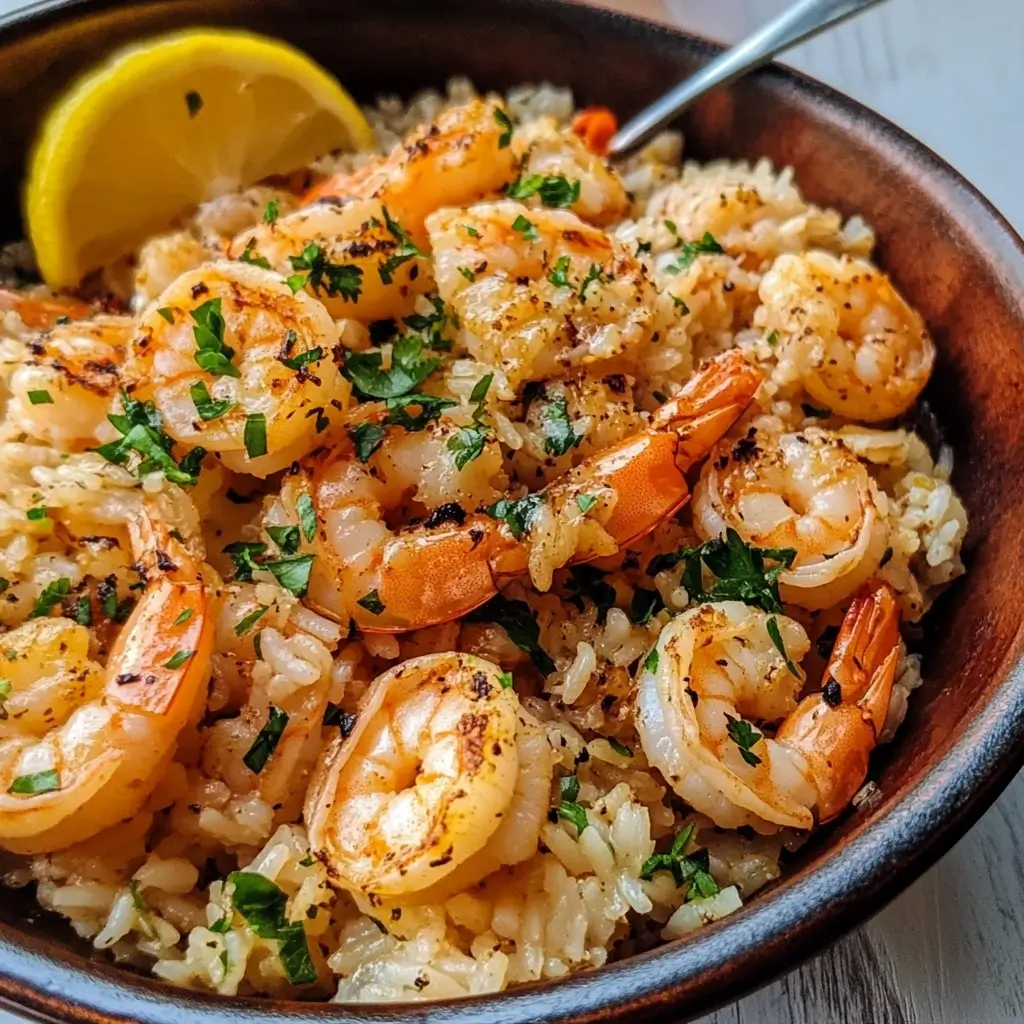
Okay, let’s dive into what has become an absolute staple in my kitchen: Garlic Butter Shrimp Rice. I remember the first time I made this; it was one of those chaotic weeknights where inspiration was low, but the desire for something truly satisfying was high. My family, usually a tough crowd with varying preferences, was suspiciously quiet during dinner. Then came the chorus of “This is amazing!” and “Can we have this again next week?” The aroma alone, a rich blend of sizzling garlic, melting butter, and succulent shrimp, had already won me over, but their enthusiastic approval sealed the deal. It’s one of those dishes that tastes incredibly indulgent and complex, yet comes together with surprising ease. The shrimp cook to tender perfection, bathed in that luscious garlic butter sauce, all served over a bed of fluffy rice that soaks up every last drop of flavor. It’s a weeknight wonder, a dinner party delight, and a personal comfort food all rolled into one. Trust me, this recipe is a keeper!
Ingredients
- For the Shrimp & Sauce:
- 1.5 lbs (680g) Large Shrimp: Peeled and deveined, tail-on or off based on preference. Fresh or frozen (and thawed) work well. Choose good quality shrimp for the best flavor and texture.
- 6 tablespoons (85g) Unsalted Butter: The star of the sauce, providing richness. Divided for use.
- 6-8 cloves Garlic: Minced. Adjust to your garlic preference; more for a bolder flavor. Freshly minced is always best.
- 1/4 cup (60ml) Dry White Wine or Chicken Broth: Optional, but adds depth and helps deglaze the pan.
- 2 tablespoons Fresh Lemon Juice: Adds a bright, zesty counterpoint to the rich butter.
- 1/4 cup Fresh Parsley: Chopped, for garnish and a fresh herby note.
- 1/2 teaspoon Red Pepper Flakes: Optional, for a touch of warmth. Adjust to your spice preference.
- Salt and Freshly Ground Black Pepper: To taste. Essential for seasoning every layer.
- 1 tablespoon Olive Oil: Helps prevent the butter from burning when searing the shrimp.
- For the Rice:
- 1.5 cups (300g) Long-Grain White Rice: Such as Jasmine or Basmati, rinsed thoroughly. This forms the perfect absorbent base.
- 2.75 cups (650ml) Water or Chicken Broth: For cooking the rice, broth adds more flavor.
- 1 tablespoon Butter (optional): For richer tasting rice.
- 1/2 teaspoon Salt (optional, if using water): To season the rice during cooking.
Instructions
1. Prepare and Cook the Rice:
* Rinse the rice under cold water until the water runs mostly clear. This removes excess starch and helps prevent gummy rice.
* In a medium saucepan with a tight-fitting lid, combine the rinsed rice, water (or broth), optional 1 tablespoon of butter, and salt (if using).
* Bring the mixture to a boil over medium-high heat.
* Once boiling, stir the rice once, then reduce the heat to the lowest setting. Cover the saucepan tightly with the lid.
* Simmer for 15-18 minutes, or until all the liquid has been absorbed and the rice is tender. Do not lift the lid during this simmering time.
* Once cooked, remove the saucepan from the heat and let it stand, covered, for at least 10 minutes. This allows the steam to finish cooking the rice.
* After resting, fluff the rice gently with a fork. Keep covered and warm while you prepare the shrimp.
2. Prepare the Shrimp:
* If using frozen shrimp, ensure they are completely thawed. Pat the shrimp thoroughly dry with paper towels. This is crucial for getting a good sear and preventing them from steaming.
* Season the shrimp generously with salt and freshly ground black pepper.
3. Cook the Shrimp:
* Heat 1 tablespoon of olive oil and 2 tablespoons of the unsalted butter in a large skillet or pan over medium-high heat until the butter is melted and foamy.
* Add the seasoned shrimp to the hot skillet in a single layer. Do not overcrowd the pan; cook in batches if necessary.
* Cook for 1-2 minutes per side, or until the shrimp turn pink and opaque and are just cooked through. Be careful not to overcook, as they will become tough.
* Remove the cooked shrimp from the skillet and set them aside on a plate.
4. Make the Garlic Butter Sauce:
* Reduce the heat under the skillet to medium-low.
* Add the remaining 4 tablespoons of unsalted butter to the same skillet.
* Once the butter is melted, add the minced garlic and red pepper flakes (if using). Cook, stirring frequently, for about 1-2 minutes until the garlic is fragrant and lightly golden. Be careful not to burn the garlic, as it will become bitter.
* If using, pour in the white wine (or chicken broth) to deglaze the pan. Scrape up any browned bits from the bottom of the skillet with a wooden spoon – these bits are packed with flavor! Let the liquid simmer and reduce slightly for about 1-2 minutes.
* Stir in the fresh lemon juice. Taste the sauce and adjust seasoning with salt and pepper if needed.
5. Combine and Finish:
* Return the cooked shrimp to the skillet with the garlic butter sauce.
* Add the chopped fresh parsley.
* Toss everything together gently to coat the shrimp evenly with the sauce and allow the shrimp to warm through for about 30 seconds to 1 minute.
6. Serve:
* Serve the Garlic Butter Shrimp immediately over the prepared fluffy rice.
* Spoon any extra garlic butter sauce from the pan over the shrimp and rice.
* Garnish with additional fresh parsley and a lemon wedge on the side, if desired.
Nutrition Facts
- Servings: 4
- Calories per serving: Approximately 550-650 kcal (This is an estimate and can vary based on exact ingredients, shrimp size, and portion sizes.)
- Protein: High in protein, primarily from the shrimp, crucial for muscle repair and satiety.
- Fat: Contains a moderate amount of fat, mostly from the butter and olive oil. Unsalted butter allows for better sodium control.
- Carbohydrates: Primarily from the rice, providing energy.
- Sodium: Can be controlled by using unsalted butter and seasoning to taste. Shrimp naturally contain some sodium.
- Vitamins & Minerals: Good source of Selenium (from shrimp) and Vitamin C (from lemon and parsley).
Preparation Time
- Total Preparation & Cooking Time: Approximately 30-40 minutes
- Prep Time (chopping garlic, parsley, rinsing rice, prepping shrimp): 10-15 minutes
- Cook Time (rice cooking, shrimp searing, sauce making): 20-25 minutes
This makes it an excellent choice for a quick and flavorful weeknight meal.
How to Serve
This Garlic Butter Shrimp Rice is a showstopper on its own, but here are some delightful ways to serve it and round out the meal:
- Classic Bowl:
- Spoon a generous portion of fluffy rice into individual bowls.
- Arrange a good amount of the garlic butter shrimp artfully on top.
- Drizzle generously with extra sauce from the pan, ensuring the rice gets some too!
- Garnish with a sprinkle of fresh parsley and a lemon wedge for squeezing.
- Family Style Platter:
- Spread the cooked rice on a large serving platter.
- Top with the saucy shrimp.
- Garnish the entire platter for a beautiful presentation perfect for sharing.
- With Steamed or Roasted Vegetables:
- Serve alongside simple steamed green beans, asparagus, or broccoli florets. The vibrant green contrasts beautifully with the pink shrimp.
- Roasted vegetables like bell peppers, zucchini, or cherry tomatoes also make a fantastic accompaniment.
- With a Side Salad:
- A light, crisp green salad with a simple vinaigrette (lemon-based would be perfect) can balance the richness of the dish. Think mixed greens, cucumber, and cherry tomatoes.
- Crusty Bread:
- Include slices of warm, crusty bread (like a baguette) on the side. It’s perfect for soaking up every last bit of that irresistible garlic butter sauce.
- Wine Pairing:
- A crisp, dry white wine like Sauvignon Blanc, Pinot Grigio, or an unoaked Chardonnay complements the dish beautifully.
- For a Lighter Meal:
- Serve a smaller portion of rice, or substitute with quinoa or cauliflower rice for a lower-carb option.
- Make it a Garlic Butter Shrimp Scampi (Pasta alternative):
- While this recipe is for rice, the shrimp and sauce are essentially a scampi. If you’re out of rice or prefer pasta, serve it over cooked linguine or angel hair pasta.
Additional Tips
- Shrimp Selection Matters: Use large or jumbo shrimp for the best, juiciest results. Look for shrimp that are already peeled and deveined to save on prep time. If using frozen, thaw them completely in the refrigerator overnight or under cold running water.
- Don’t Overcrowd the Pan: When cooking the shrimp, ensure they are in a single layer in the skillet. Overcrowding will lower the pan’s temperature, causing the shrimp to steam rather than sear, resulting in a less flavorful and potentially rubbery texture. Cook in batches if necessary.
- Pat Shrimp Dry: This is a critical step! Use paper towels to pat the shrimp thoroughly dry before seasoning and searing. Dry shrimp will brown better and develop a more appealing texture.
- Fresh Garlic and Lemon Juice for Best Flavor: While pre-minced garlic and bottled lemon juice are convenient, using fresh garlic cloves (minced just before use) and freshly squeezed lemon juice will provide a significantly brighter and more robust flavor to your sauce.
- Control the Heat for Garlic: When sautéing the garlic, keep the heat at medium-low. Garlic burns quickly, and burnt garlic tastes bitter and unpleasant. Cook it just until it’s fragrant and lightly golden.
- Deglaze for Flavor: Don’t skip the deglazing step if using wine or broth! Those little browned bits (fond) stuck to the bottom of the pan after searing the shrimp are packed with concentrated flavor. Scraping them up incorporates them into the sauce, adding incredible depth.
- Don’t Overcook the Shrimp: Shrimp cook very quickly, usually just 1-2 minutes per side. They are done when they turn pink and opaque and curl into a “C” shape. Overcooked shrimp become tough and rubbery. Remember they will cook a little more when returned to the sauce.
- Adjust Seasoning and Spice: Taste the sauce before adding the shrimp back in and adjust salt, pepper, lemon juice, or red pepper flakes to your preference. You might want it spicier, more lemony, or saltier. This is your chance to perfect it!
FAQ Section
Q1: Can I use frozen shrimp for this recipe?
A1: Absolutely! Frozen shrimp work perfectly. Just ensure they are fully thawed before you begin. You can thaw them overnight in the refrigerator or for a quicker method, place them in a colander under cold running water for 5-10 minutes until thawed. Pat them very dry with paper towels before cooking.
Q2: What if I don’t have white wine? What are good substitutes?
A2: Chicken broth is the best substitute for white wine in this recipe. It will still help deglaze the pan and add flavor. You could also use vegetable broth or even a splash of shrimp stock if you have it. If you have none of these, a little extra lemon juice mixed with a tablespoon of water can work in a pinch, though the flavor profile will be slightly different.
Q3: How can I make this dish spicier?
A3: There are several ways! You can increase the amount of red pepper flakes. For a different kind of heat, add a pinch of cayenne pepper along with the red pepper flakes. You could also add a finely minced jalapeño or serrano pepper (seeds removed for less heat) when you sauté the garlic. A dash of your favorite hot sauce stirred into the finished sauce works too.
Q4: Can I use pre-cooked shrimp?
A4: While you can, it’s not ideal. Pre-cooked shrimp can easily become overcooked and rubbery when reheated. If you must use them, add them to the sauce at the very end, just to warm through for about 30 seconds to a minute. Do not sear them first. Fresh, raw shrimp will yield the best texture and flavor.
Q5: What type of rice is best for Garlic Butter Shrimp Rice?
A5: Long-grain white rice varieties like Jasmine or Basmati are excellent choices. They cook up fluffy and separate, providing a perfect bed for the shrimp and sauce. You could also use medium-grain rice. Brown rice can be used for a healthier, nuttier option, but it will require a longer cooking time and more liquid, so cook it according to its package directions.
Q6: How do I store and reheat leftovers?
A6: Store leftover Garlic Butter Shrimp Rice in an airtight container in the refrigerator for up to 2-3 days. To reheat, you can gently warm it in a skillet over low heat, adding a splash of water or broth to prevent drying out, until heated through. Alternatively, microwave it in short intervals, stirring in between, until warm. Be careful not to overheat, as this can make the shrimp tough.
Q7: Can I make this recipe dairy-free?
A7: Yes, you can adapt it. For a dairy-free version, substitute the unsalted butter with a good quality dairy-free butter alternative or use all olive oil. The flavor profile will change slightly, but it will still be delicious. Ensure your broth (if using) is also dairy-free.
Q8: My shrimp came out rubbery. What did I do wrong?
A8: Rubbery shrimp are almost always a result of overcooking. Shrimp cook very quickly. They only need 1-2 minutes per side until they turn pink and opaque and form a gentle “C” shape. If they curl into a tight “O” shape, they’re likely overdone. Also, remember they cook a little more when added back to the sauce. Next time, cook them for slightly less time during the initial sear.