
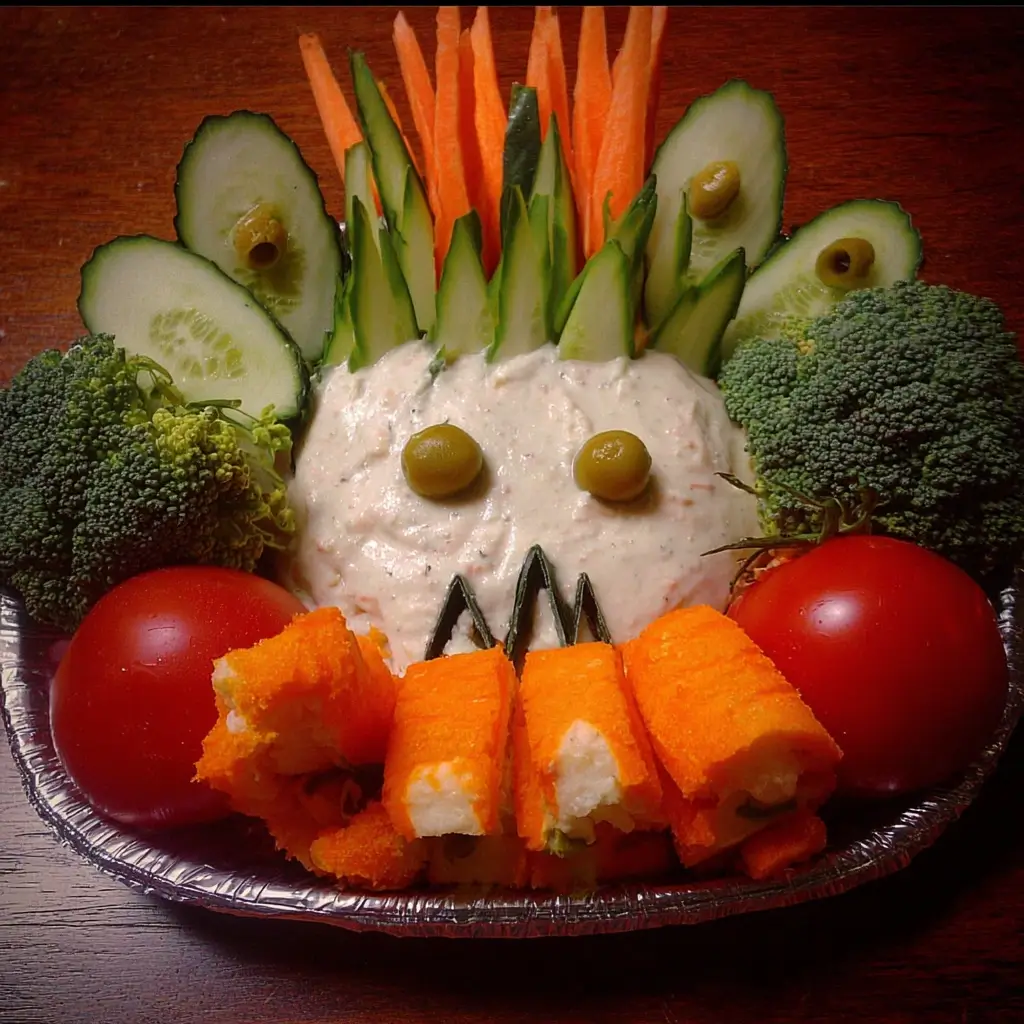
Of all the traditions that come with Halloween—the costumes, the spooky movies, the trick-or-treating—navigating the endless sea of sugar is always the biggest challenge in our house. Every year, I find myself looking for a way to inject a little bit of balance into the festivities, something that feels just as fun and on-theme as a cauldron of candy but won’t lead to an inevitable sugar crash. That’s how this Creepy Veggie Platter was born. The first time I assembled it for my kids’ Halloween party, their eyes went wide. They were so captivated by the veggie skeleton, the bell pepper jack-o’-lanterns, and the little cucumber monsters that they completely forgot they were about to eat a plate full of vegetables. It was a massive success, not just with the kids but with the parents, too, who were all thrilled to see a vibrant, healthy option on the table. It has since become our non-negotiable Halloween centerpiece, the perfect ghoulishly good appetizer that proves healthy eating can be incredibly fun and festive.
Why a Creepy Veggie Platter is the Star of Any Halloween Party
Before we dive into the nitty-gritty of carving and arranging, let’s talk about why this platter is more than just a collection of vegetables. In a landscape dominated by sweets, a well-crafted veggie platter is a beacon of balance and creativity. It’s an unsung hero of the Halloween party scene, and here’s why it deserves a prime spot on your spooky spread.
First and foremost, it offers a healthy counterpoint to the sugary treats. Halloween is synonymous with candy, cakes, and cookies. While those are undeniably part of the fun, having a savory, nutrient-rich option available provides a much-needed break for everyone’s palate and digestive system. It allows guests, both kids and adults, to fill up on something wholesome, potentially curbing the temptation to overindulge in sugar later on. It’s a thoughtful touch that parents, in particular, will deeply appreciate.
Secondly, this platter is incredibly inclusive and allergy-friendly. Many common Halloween treats contain nuts, dairy, gluten, or other allergens. A platter of fresh vegetables and a simple dip can easily be made to accommodate almost any dietary restriction. It’s naturally gluten-free, dairy-free (depending on the dip), nut-free, and vegan, ensuring that all your guests have something safe and delicious to enjoy without having to second-guess the ingredients.
Beyond its health benefits, the Creepy Veggie Platter serves as a stunning visual centerpiece. Food presentation is a huge part of the party experience, and this platter is designed to be a conversation starter. The vibrant colors of the vegetables arranged into spooky shapes like a skeleton or a graveyard scene instantly draw the eye and contribute to the overall party décor. It’s edible art that sets a festive, fun-loving tone the moment guests walk in. You’ll find people gathering around it, pointing out the clever details and snapping pictures before they even take a bite.
Finally, preparing this platter can be a fun family activity. Unlike complex baked goods that require precise measurements and oven timing, assembling a veggie platter is a forgiving and creative process. You can get the kids involved in washing the vegetables, arranging the pieces, or even helping to carve the simpler shapes (with supervision, of course). It’s a wonderful way to teach them about healthy foods in a playful context and build excitement for the party together. This shared creation becomes a source of pride for them when they see it displayed for all the guests to admire. It’s not just food; it’s a memory in the making.
Ingredients
- For the Veggie Skeleton & Scenery:
- Cauliflower: 1 medium head, cut into florets (Forms the skeleton’s rib cage and brain-like textures).
- Mushrooms: 8 oz, sliced (Perfect for creating the pelvic bones and other rounded joints).
- Celery Stalks: 4-5 stalks, cut into 3-inch pieces (The ideal straight bones for arms and legs).
- Baby Carrots: 1 cup (Used for fingers, toes, and adding pops of color).
- Cucumber: 1 large, sliced into rounds and spears (Versatile for the spine, monster shapes, or grave markers).
- Broccoli Florets: 1 cup (Excellent for creating a spooky, mossy graveyard floor or spooky trees).
- Cherry Tomatoes: 1 pint (Can be used as eyeballs or scattered for a bloody effect).
- Black Olives: 1 can, pitted (Essential for creating eyes, pupils, and other dark, spooky details).
- For the Jack-O’-Lantern Bell Peppers:
- Orange Bell Peppers: 2 medium-sized (The perfect shape and color for mini, edible pumpkins).
- For the “Ghostly” Dip:
- Ranch Dip or Hummus: 2 cups of your favorite store-bought or homemade dip (The base for our central dip bowl, which will become a ghost).
- Small Bowl: 1, to hold the dip (This will act as the skeleton’s head or a standalone ghost).
Instructions
Creating your Creepy Veggie Platter is more of an art project than a strict recipe. Follow these steps as a guide, but feel free to let your spooky creativity run wild!
Step 1: Prepare Your “Canvas” and Dip
Select a large, dark-colored platter or cutting board. A black or dark gray slate board works exceptionally well, as it makes the colors of the vegetables pop and adds to the eerie aesthetic. Place your small dip bowl at the top center of the platter. This will become the head of your skeleton. Fill the bowl with your chosen dip (ranch, hummus, or another creamy, light-colored dip). Smooth the top with the back of a spoon.
Step 2: Create the Ghostly Face
Take two sliced black olives and carefully place them on the dip to create the eyes of a ghost. You can use a whole olive for a wide-eyed look or slice them into crescents for a more menacing expression. If you wish, you can cut a small piece of a black olive into an “O” shape for a screaming mouth. Set this aside.
Step 3: Assemble the Vegetable Skeleton
This is the main event. Work your way down from the dip bowl “head.”
- Spine: Arrange a line of cucumber rounds or a long celery stalk directly below the bowl to form the spine.
- Rib Cage: Place the cauliflower florets on either side of the top of the spine. Arrange them in a curved, downward-sloping shape to mimic a rib cage. Don’t worry about perfection; the bumpy texture of the cauliflower is naturally “boney” and looks great.
- Pelvis: Use two large, curved mushroom slices at the base of the spine to create the pelvic bone.
- Arms & Legs: Lay out celery stalks extending from the shoulder and hip areas. These are your long bones. Use a mushroom slice or a cherry tomato to represent the shoulder and hip joints.
- Hands & Feet: At the end of each arm and leg, arrange five baby carrots to look like fingers and toes.
Step 4: Carve the Jack-O’-Lantern Peppers
Take your orange bell peppers. Slice the tops off just as you would a real pumpkin, and clean out the seeds and membranes. Using a small, sharp paring knife, carefully carve faces into the side of each pepper. Triangles for eyes and a nose, and a jagged little smile work perfectly. Be gentle so you don’t crack the pepper. These can be placed around the skeleton or filled with more dip or other small veggies like cherry tomatoes.
Step 5: Build the Spooky Scenery
Now, use the remaining vegetables to fill in the space around your skeleton and create a ghoulish graveyard scene.
- Ground/Grass: Scatter the broccoli florets around the base of the platter to look like mossy ground or grass.
- Tombstones: Stand cucumber spears or rectangular carrot sticks upright among the broccoli to look like grave markers.
- Creatures & Critters: Halve some cherry tomatoes and top them with a small piece of black olive to create “eyeballs.” Slice cucumbers and use a straw to punch out two eyeholes, then use a knife to cut a small mouth to make little green monsters.
Step 6: Final Touches
Step back and look at your platter. Fill in any sparse areas with more carrots, tomatoes, or cucumbers. You can slice a few black olives into rings and scatter them around for extra detail. Your masterpiece is now ready to be unveiled!
Nutrition Facts
- Servings: 12-15
- Calories Per Serving: Approximately 70-100 kcal (This will vary based on the dip chosen and exact vegetable quantities).
- Vitamin C: Bell peppers, broccoli, and tomatoes are packed with Vitamin C, an essential antioxidant that supports a healthy immune system—perfect for fending off seasonal sniffles.
- Fiber: Nearly every component, from the celery to the carrots and cauliflower, is an excellent source of dietary fiber, which aids in digestion and helps you feel full and satisfied.
- Low in Saturated Fat: This platter is naturally very low in saturated fat and cholesterol, making it a heart-healthy choice for guests of all ages.
- Rich in Phytonutrients: The vibrant array of colors isn’t just for show; it signifies a wide range of phytonutrients and antioxidants that help protect your body’s cells from damage.
- Hydration: Vegetables like cucumbers and celery have high water content, contributing to overall hydration—a benefit often overlooked at parties.
Preparation Time
- Total Preparation Time: 30-45 minutes
- This platter is all about the prep work—washing, chopping, and arranging. There is no cooking time involved. The total time will depend on how intricate you decide to make your design. Rushing the process is not recommended; pour yourself a spooky beverage, put on a Halloween playlist, and enjoy the creative process of bringing your creepy creation to life.
How to Serve
Presenting your Creepy Veggie Platter effectively is key to maximizing its “wow” factor. Here are some ideas for serving it up in style:
- The Main Event:
- Make the platter the absolute centerpiece of your food table. Place it right in the middle where it’s the first thing guests see.
- Consider elevating it on a cake stand to give it height and prominence over other dishes.
- Dip Variety:
- While the “ghost” dip bowl is central, consider having other dips in small cauldrons or pumpkin-shaped bowls nearby.
- Swamp Dip: A vibrant green guacamole or a spinach dip.
- Bloody Dip: A roasted red pepper hummus or a zesty tomato salsa.
- Witch’s Brew: A dark-colored dip like a black bean dip.
- Don’t forget to label your dips, especially if you have guests with allergies.
- Thematic Pairings:
- Serve the platter alongside other spooky-themed appetizers to create a cohesive food story.
- Mummy Dogs: Hot dogs wrapped in strips of pastry.
- Witch’s Finger Pretzels: Pretzel rods dipped in green candy melts with a sliced almond for a fingernail.
- Spiderweb Taco Dip: A seven-layer dip with sour cream piped on top in a spiderweb pattern.
- Setting the Scene:
- Drape your table with a black or orange tablecloth, or even some fake spiderwebs (just keep them away from direct contact with the food).
- Scatter plastic spiders, rubber bats, or skull confetti around the base of the platter for an extra layer of spookiness.
- Use low lighting or battery-operated candles to create a haunted, moody atmosphere that will make your veggie platter look even more dramatic.
Additional Tips
- Prep in Advance, Assemble Later: To save time on party day, you can do most of the prep work the day before. Wash and chop all your vegetables (except for any you worry will brown, like mushrooms). Store them in separate airtight containers or zip-top bags in the refrigerator. On the day of the party, all you need to do is arrange them on the platter, which will only take about 15-20 minutes.
- Keep it Fresh and Crisp: Vegetables can start to look a little sad if they sit out for too long. To keep them looking their best, you can give them a quick ice bath before plating. Submerge your cut veggies in a bowl of ice water for 10-15 minutes, then drain and pat them dry. This makes them extra crisp and vibrant. If the party is long, you can also try nestling the platter on a larger tray filled with ice.
- Get the Kids Involved: This is the perfect recipe for little helpers. Assign age-appropriate tasks. Younger kids can wash vegetables, snap the ends off green beans, or place the broccoli “grass.” Older kids can help arrange the skeleton, make the ghost face on the dip, or even try carving the bell peppers with a safety knife and adult supervision. It makes them feel proud of the final product and more likely to eat it!
- Customize for Picky Eaters: The beauty of a veggie platter is its versatility. If you know your audience dislikes mushrooms or cauliflower, feel free to substitute! Use sliced jicama or turnip for bones, bell pepper strips for ribs, or green beans for fingers and toes. The concept is the key, not the specific ingredients. Add some kid-friendly favorites like snap peas or mini sweet peppers to ensure there’s something for everyone.
- Don’t Strive for Perfection: Remember, it’s supposed to look “creepy,” “boney,” and a little bit messy! Don’t stress if your skeleton’s ribs are crooked or your jack-o’-lantern’s smile is lopsided. The charming, homemade quality is part of what makes it so special. Have fun with it—the goal is a fun, festive snack, not an anatomical diagram. Your guests will love the effort and creativity no matter what.
FAQ Section
Q1: Can I make the entire veggie platter ahead of time?
A: It’s best to assemble it as close to party time as possible for maximum freshness, ideally no more than 2-3 hours beforehand. However, you can do all the vegetable washing and chopping up to 24 hours in advance and store the veggies in airtight containers in the fridge. The dip can also be made or purchased ahead of time. The final assembly is the quickest part!
Q2: What are some other creative and spooky veggie shapes I can try?
A: Absolutely! Get creative with cookie cutters. Use a ghost-shaped cookie cutter on slices of jicama or turnip. Cut carrots into coffin shapes. You can create “eyeballs” by taking a thick slice of cucumber, scooping a small hole in the middle, and placing a halved cherry tomato or a piece of carrot inside. You can also create “worms” by julienning carrots and zucchini and piling them up.
Q3: What’s the absolute best dip to serve with this platter?
A: The “best” dip depends on your guests’ preferences! For a classic, kid-friendly option, a creamy ranch or a French onion dip is always a winner. For a healthier and vegan-friendly choice, hummus is fantastic—you can even find it in different flavors like roasted red pepper (for a “bloody” look) or cilantro-jalapeño. For something unique, a green goddess dressing or a dill dip also works beautifully and fits the spooky color scheme.
Q4: How should I store any leftovers?
A: Leftovers are easy to store. Disassemble the platter and store the cut vegetables in an airtight container in the refrigerator for up to 3-4 days. Scrape the dip into a separate airtight container. The leftover veggies are perfect for adding to salads, stir-fries, or just for healthy snacking throughout the week.
Q5: My kids are very picky and don’t like many of the vegetables listed. What are some good substitutes?
A: This platter is highly adaptable for picky eaters. If cauliflower is a no-go for the ribs, try using curved slices of bell peppers (white, yellow, or red). If celery isn’t popular, use green beans or asparagus spears for the bones. Snap peas are a great crunchy alternative for arms and legs. The key is to maintain the shapes. You can also add a small section of “safe” fruits like apple slices or grapes to the platter to ensure even the pickiest child has something to grab.
Creepy Veggie Platter
- Total Time: 45 minutes
Ingredients
- For the Veggie Skeleton & Scenery:
- Cauliflower: 1 medium head, cut into florets (Forms the skeleton’s rib cage and brain-like textures).
- Mushrooms: 8 oz, sliced (Perfect for creating the pelvic bones and other rounded joints).
- Celery Stalks: 4-5 stalks, cut into 3-inch pieces (The ideal straight bones for arms and legs).
- Baby Carrots: 1 cup (Used for fingers, toes, and adding pops of color).
- Cucumber: 1 large, sliced into rounds and spears (Versatile for the spine, monster shapes, or grave markers).
- Broccoli Florets: 1 cup (Excellent for creating a spooky, mossy graveyard floor or spooky trees).
- Cherry Tomatoes: 1 pint (Can be used as eyeballs or scattered for a bloody effect).
- Black Olives: 1 can, pitted (Essential for creating eyes, pupils, and other dark, spooky details).
- For the Jack-O’-Lantern Bell Peppers:
- Orange Bell Peppers: 2 medium-sized (The perfect shape and color for mini, edible pumpkins).
- For the “Ghostly” Dip:
- Ranch Dip or Hummus: 2 cups of your favorite store-bought or homemade dip (The base for our central dip bowl, which will become a ghost).
- Small Bowl: 1, to hold the dip (This will act as the skeleton’s head or a standalone ghost).
Instructions
Creating your Creepy Veggie Platter is more of an art project than a strict recipe. Follow these steps as a guide, but feel free to let your spooky creativity run wild!
Step 1: Prepare Your “Canvas” and Dip
Select a large, dark-colored platter or cutting board. A black or dark gray slate board works exceptionally well, as it makes the colors of the vegetables pop and adds to the eerie aesthetic. Place your small dip bowl at the top center of the platter. This will become the head of your skeleton. Fill the bowl with your chosen dip (ranch, hummus, or another creamy, light-colored dip). Smooth the top with the back of a spoon.
Step 2: Create the Ghostly Face
Take two sliced black olives and carefully place them on the dip to create the eyes of a ghost. You can use a whole olive for a wide-eyed look or slice them into crescents for a more menacing expression. If you wish, you can cut a small piece of a black olive into an “O” shape for a screaming mouth. Set this aside.
Step 3: Assemble the Vegetable Skeleton
This is the main event. Work your way down from the dip bowl “head.”
- Spine: Arrange a line of cucumber rounds or a long celery stalk directly below the bowl to form the spine.
- Rib Cage: Place the cauliflower florets on either side of the top of the spine. Arrange them in a curved, downward-sloping shape to mimic a rib cage. Don’t worry about perfection; the bumpy texture of the cauliflower is naturally “boney” and looks great.
- Pelvis: Use two large, curved mushroom slices at the base of the spine to create the pelvic bone.
- Arms & Legs: Lay out celery stalks extending from the shoulder and hip areas. These are your long bones. Use a mushroom slice or a cherry tomato to represent the shoulder and hip joints.
- Hands & Feet: At the end of each arm and leg, arrange five baby carrots to look like fingers and toes.
Step 4: Carve the Jack-O’-Lantern Peppers
Take your orange bell peppers. Slice the tops off just as you would a real pumpkin, and clean out the seeds and membranes. Using a small, sharp paring knife, carefully carve faces into the side of each pepper. Triangles for eyes and a nose, and a jagged little smile work perfectly. Be gentle so you don’t crack the pepper. These can be placed around the skeleton or filled with more dip or other small veggies like cherry tomatoes.
Step 5: Build the Spooky Scenery
Now, use the remaining vegetables to fill in the space around your skeleton and create a ghoulish graveyard scene.
- Ground/Grass: Scatter the broccoli florets around the base of the platter to look like mossy ground or grass.
- Tombstones: Stand cucumber spears or rectangular carrot sticks upright among the broccoli to look like grave markers.
- Creatures & Critters: Halve some cherry tomatoes and top them with a small piece of black olive to create “eyeballs.” Slice cucumbers and use a straw to punch out two eyeholes, then use a knife to cut a small mouth to make little green monsters.
Step 6: Final Touches
Step back and look at your platter. Fill in any sparse areas with more carrots, tomatoes, or cucumbers. You can slice a few black olives into rings and scatter them around for extra detail. Your masterpiece is now ready to be unveiled!
Nutrition
- Serving Size: one normal portion
- Calories: 100