Let me tell you, these Almond Butter Granola Cups have become an absolute staple in our household, and I’m beyond excited to share this gem of a recipe with you. For years, I was on the hunt for a snack that ticked all the boxes: healthy, satisfying, easy to make, and, most importantly, something my kids would actually eat without complaint. Store-bought granola bars often came with a long list of unpronounceable ingredients or an alarming amount of sugar. I wanted something wholesome, something I could feel good about packing in lunchboxes or grabbing for a quick energy boost. When I first stumbled upon the idea of making my own granola cups, I was intrigued but a little skeptical about how they’d turn out. The first batch was good, but it took a few tweaks to get them just right. The version I’m sharing today? It’s perfection. The balance of chewy oats, crunchy nuts (if you choose to add them), the rich creaminess of almond butter, and just the right touch of sweetness from honey or maple syrup is simply divine. My eldest, who can be notoriously picky, now requests these “yummy crunch cups” weekly. My husband grabs one on his way out the door for his morning commute, and I find myself reaching for one as a mid-afternoon pick-me-up to combat that dreaded energy slump. They are surprisingly versatile – a quick breakfast on the go, a post-workout refuel, or even a healthier dessert option when topped with a little dark chocolate drizzle. The beauty of this recipe lies not only in its deliciousness but also in its simplicity and adaptability. You can truly make it your own. The aroma that fills the kitchen as these set (or bake, if you prefer that method) is a warm, inviting hug of toasted oats and nutty goodness. They’ve saved me on countless busy mornings and have become a beloved treat that doesn’t come with a side of guilt. So, if you’re looking for a recipe that will delight your taste buds and nourish your body, you’ve come to the right place. Get ready to fall in love with these Almond Butter Granola Cups!
Ingredients for Delicious Almond Butter Granola Cups
Here’s what you’ll need to create these irresistible treats. Each ingredient plays a crucial role in the texture and flavor profile, so try to use high-quality components for the best results.
- 1 ½ cups Rolled Oats (Old-Fashioned): The hearty base of our cups, providing a chewy texture and sustained energy. Do not use instant or steel-cut oats, as they will alter the texture significantly.
- ½ cup Chopped Almonds (or other nuts/seeds): Adds a delightful crunch and extra nutritional value. You can use slivered almonds, chopped walnuts, pecans, or even sunflower or pumpkin seeds for a nut-free option.
- ¼ cup Shredded Unsweetened Coconut (optional): Imparts a subtle tropical sweetness and lovely texture. If you’re not a coconut fan, feel free to omit it.
- ½ teaspoon Ground Cinnamon: A warming spice that complements the almond butter and oats beautifully.
- ¼ teaspoon Salt: Enhances all the other flavors and balances the sweetness.
- ½ cup Creamy Almond Butter: The star of the show! Provides richness, healthy fats, protein, and acts as a primary binder. Ensure it’s well-stirred if it’s natural almond butter where oil separation occurs.
- ⅓ cup Honey or Maple Syrup: Your natural sweetener and another key binder. Maple syrup will make these vegan-friendly. Adjust the amount slightly based on your preferred sweetness.
- ¼ cup Coconut Oil, melted: Helps to bind the ingredients together and adds a subtle richness. It also helps the cups firm up when chilled.
- 1 teaspoon Vanilla Extract: Elevates the overall flavor profile, adding a touch of warmth and depth.
- Optional Topping: ¼ cup Dark Chocolate Chips, melted: For an extra touch of indulgence, a drizzle of dark chocolate takes these cups to the next level.
Step-by-Step Instructions to Create Your Granola Cups
Follow these simple steps, and you’ll have a batch of delicious Almond Butter Granola Cups ready in no time. This recipe is designed to be straightforward, even for beginner bakers or those who prefer no-bake treats.
- Prepare Your Muffin Tin: Line a standard 12-cup muffin tin with paper liners or silicone liners. This prevents sticking and makes for easy removal and cleanup. If you don’t have liners, you can lightly grease the muffin cups, but liners are highly recommended for the cleanest results.
- Combine Dry Ingredients: In a large mixing bowl, add the rolled oats, chopped almonds (or your chosen nuts/seeds), shredded coconut (if using), ground cinnamon, and salt. Whisk them together thoroughly to ensure all the dry components are evenly distributed. This step is crucial for a consistent flavor and texture in every cup.
- Combine Wet Ingredients: In a separate, microwave-safe bowl or a small saucepan over low heat, combine the almond butter, honey or maple syrup, and coconut oil.
- Microwave method: Heat in 30-second intervals, stirring in between, until the coconut oil is melted and the mixture is smooth and pourable. This usually takes about 60-90 seconds.
- Stovetop method: Heat over low heat, stirring continuously, until the coconut oil is melted and everything is well combined and runny. Be careful not to let it boil or scorch.
- Add Vanilla: Once the wet mixture is smooth, remove it from the heat (if using the stovetop) and stir in the vanilla extract. The warmth of the mixture will help release the vanilla’s aroma.
- Combine Wet and Dry Ingredients: Pour the warm, wet almond butter mixture over the dry oat mixture in the large bowl. Using a sturdy spatula or wooden spoon, mix thoroughly until all the dry ingredients are well-coated and the mixture is cohesive. Scrape the sides and bottom of the bowl to ensure everything is incorporated.
- Portion into Muffin Cups: Divide the granola mixture evenly among the 12 prepared muffin cups. A standard ice cream scoop or a ¼ cup measuring cup works well for uniform portions.
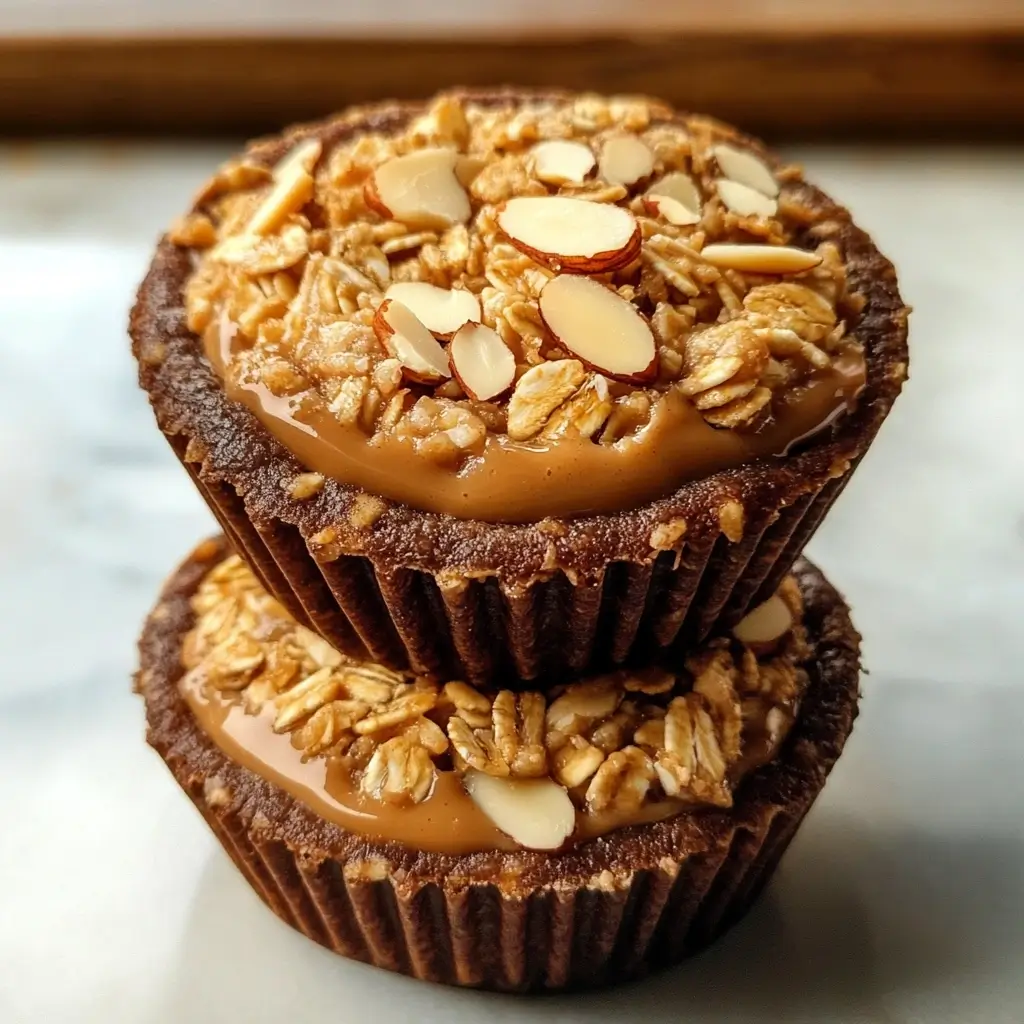
- Press Mixture Firmly: This is a critical step! Use the back of a spoon, your fingers (you can lightly dampen them to prevent sticking), or the bottom of a small glass to press the mixture down firmly and evenly into each muffin cup. Compacting the mixture well helps the cups hold their shape once chilled and set. Ensure the tops are relatively flat.
- Chill to Set: Place the muffin tin in the refrigerator for at least 30 minutes, or preferably 1-2 hours, to allow the granola cups to firm up. The coconut oil and almond butter will solidify as they cool, binding the cups together. For a quicker set, you can place them in the freezer for 15-20 minutes.
- Optional Chocolate Topping (If Desired):
- Once the cups are firm, you can prepare the chocolate topping. Melt the dark chocolate chips in a microwave-safe bowl in 20-second intervals, stirring in between, until smooth. Alternatively, use a double boiler.
- Drizzle the melted chocolate over the tops of the chilled granola cups. You can do this with a spoon or transfer the chocolate to a small piping bag or a zip-top bag with a tiny corner snipped off for more control.
- If you add chocolate, return the cups to the refrigerator for another 10-15 minutes to allow the chocolate to set.
- Remove and Store: Once fully set, carefully remove the granola cups from the muffin tin. They are now ready to be enjoyed! Store them in an airtight container in the refrigerator.
Almond Butter Granola Cups: Nutrition Snapshot
Understanding the nutritional value of what you eat is key to a healthy lifestyle. These Almond Butter Granola Cups are not just delicious, but they also pack a decent nutritional punch. Please note that these values are approximate and can vary based on the specific brands of ingredients used and any modifications made.
- Servings: This recipe makes 12 individual granola cups.
- Calories per serving (1 cup): Approximately 220-280 calories. This range depends heavily on the amount of nuts, seeds, and type of sweetener used, as well as the addition of chocolate.
Key Nutrition Highlights (per cup, approximate):
- Healthy Fats (approx. 15-20g): Primarily from almond butter and coconut oil, these are largely monounsaturated and polyunsaturated fats, which are beneficial for heart health and satiety.
- Protein (approx. 5-7g): Almond butter and oats contribute a good amount of plant-based protein, essential for muscle repair, and keeping you feeling fuller for longer.
- Dietary Fiber (approx. 3-4g): Sourced mainly from rolled oats and almonds, fiber aids in digestion, helps regulate blood sugar levels, and contributes to a feeling of fullness.
- Carbohydrates (approx. 20-25g): Oats and sweeteners provide carbohydrates, which are the body’s primary source of energy, making these cups a great option for a quick energy boost.
- Lower in Refined Sugar (compared to many commercial bars): By using natural sweeteners like honey or maple syrup and controlling the amount, these cups are generally lower in refined sugars than many store-bought alternatives.
These granola cups offer a balanced mix of macronutrients, making them a more wholesome choice for a snack or a quick breakfast component compared to many processed options.
Quick & Easy: Preparation Time
One of the many appeals of this Almond Butter Granola Cup recipe is how quickly it comes together. It’s perfect for busy individuals or when you need a healthy snack without spending hours in the kitchen.
- Active Preparation Time: Approximately 15-20 minutes. This includes gathering your ingredients, mixing the dry and wet components, and pressing the mixture into the muffin tin. If you’re quick and organized, you might even do it in 10-15 minutes!
- Chilling Time: Minimum 30 minutes in the refrigerator, but 1-2 hours is ideal for the best firm texture. If you’re in a hurry, about 15-20 minutes in the freezer will also work. If adding a chocolate topping, factor in an additional 10-15 minutes of chilling time for the chocolate to set.
- Total Time (including minimum chilling): Roughly 45 minutes to 1 hour and 20 minutes.
Short Description:
These Almond Butter Granola Cups are a wonderfully efficient recipe. The hands-on work is minimal, mainly involving measuring and mixing. The majority of the “time” is passive chilling time, where the refrigerator does the work of firming up these delicious treats. This makes them an excellent choice for meal prepping on a Sunday afternoon for the week ahead, or even whipping up a batch on a weeknight without much fuss. The speed and simplicity mean you can enjoy homemade, wholesome goodness without a significant time commitment.
Creative Ways to Serve Your Almond Butter Granola Cups
These Almond Butter Granola Cups are incredibly versatile and can be enjoyed in numerous ways, fitting into various parts of your day. Here are some creative ideas to serve and savor them:
- The Quick Grab-and-Go Breakfast:
- Perfect for busy mornings when you need something nutritious to eat on the run. Pair one or two with a piece of fruit like a banana or apple for a more complete start to your day.
- With Yogurt and Berries:
- Crumble a granola cup over a bowl of Greek yogurt or your favorite plant-based yogurt.
- Top with fresh berries (blueberries, raspberries, strawberries) for added antioxidants and vitamins. This creates a beautiful and satisfying parfait.
- As a Pre-Workout Energy Booster:
- Consume one cup about 30-60 minutes before a workout for a sustained release of energy, thanks to the carbohydrates from oats and healthy fats from almond butter.
- Post-Workout Recovery Snack:
- The protein and carbs help replenish energy stores and aid in muscle recovery after exercise.
- Healthy School or Work Snack:
- Pack them in lunchboxes for kids or take them to work for a wholesome mid-day snack that will keep you energized and focused, avoiding the temptation of less healthy vending machine options.
- A Lighter Dessert Option:
- Especially if topped with dark chocolate, these can satisfy a sweet craving in a healthier way than traditional desserts. Serve with a small scoop of nice cream or a cup of herbal tea.
- Alongside a Smoothie:
- Enjoy a granola cup on the side of your morning smoothie for added texture and a more substantial meal.
- Crumble Topping for Baked Fruit:
- Crumble a cup over baked apples or pears towards the end of their baking time for a delicious, crunchy topping.
- On-the-Go Trail Snack:
- Individually wrap them and take them hiking, biking, or on road trips for a convenient and mess-free energy source.
- With a Glass of Milk (or Plant-Based Milk):
- A classic pairing! Enjoy with a cold glass of dairy milk, almond milk, soy milk, or oat milk for a comforting snack.
Experiment with these suggestions or come up with your own – these granola cups are a fantastic canvas for your culinary creativity!
Pro Tips for Perfect Almond Butter Granola Cups Every Time
To ensure your Almond Butter Granola Cups turn out perfectly batch after batch, here are eight valuable tips. These insights can help you troubleshoot common issues and elevate your granola cup game.
- Use Quality, Runny Almond Butter: The consistency of your almond butter matters. Natural, drippy almond butter (the kind where oil separates and you need to stir it) works best as it blends more easily with the honey/maple syrup and coconut oil, creating a better binder. If your almond butter is very thick or dry, gently warm it for a few seconds to make it more pliable.
- Don’t Skimp on Pressing: This is arguably the most crucial step for well-formed cups. Press the granola mixture very firmly into the muffin liners. Use the bottom of a small glass or a tart tamper for even pressure. This compaction is what helps them hold their shape and prevents them from being too crumbly.
- Liner Loyalty: Always use paper or silicone muffin liners. They make removal a breeze and ensure your cups don’t stick to the pan. Silicone liners are reusable and fantastic for perfectly smooth edges.
- Chill Thoroughly: Patience is key. Ensure the cups are chilled for the recommended time (at least 30 minutes in the fridge, ideally longer, or 15-20 minutes in the freezer). This allows the coconut oil and almond butter to solidify properly, binding everything together. Rushing this step can lead to crumbly cups.
- Customize Your Crunch and Chew:
- For crunchier cups: Add more nuts, seeds, or even a tablespoon of chia seeds or flax seeds. You can also lightly toast your oats and nuts before mixing for enhanced flavor and crunch (let them cool before adding).
- For chewier cups: Ensure you’re using rolled oats (not quick oats), and you can slightly increase the honey/maple syrup ratio, though be mindful not to make the mixture too wet.
- Control the Sweetness: Taste your wet mixture before combining it with the dry ingredients (if using ingredients safe to taste raw, like maple syrup). Adjust the sweetener (honey/maple syrup) according to your preference. Remember that almond butter itself can have varying levels of sweetness depending on the brand.
- Ingredient Temperature Matters: Ensure your melted coconut oil and almond butter mixture is warm (but not scorching hot) when you pour it over the dry ingredients. This helps everything meld together beautifully. If it’s too cool, it might start to solidify too quickly, making it harder to mix and press.
- Storage is Key for Freshness: Store your finished granola cups in an airtight container in the refrigerator. They will stay fresh and maintain their firm texture for up to a week. If left at room temperature for too long, especially in warmer climates, they can soften and become crumbly due to the coconut oil melting. For longer storage, they freeze beautifully.
Your Almond Butter Granola Cup Questions Answered: FAQ
Here are answers to some frequently asked questions about making Almond Butter Granola Cups. This section aims to address common queries and help you achieve the best results with your homemade treats.
- Q: Can I use a different nut butter instead of almond butter?
- A: Absolutely! Peanut butter is a classic and delicious alternative. Cashew butter, sunflower seed butter (for a nut-free option), or tahini can also work well. Keep in mind that the flavor profile will change, and you might need to adjust the sweetener slightly depending on the sweetness of the butter you choose. Ensure it’s a creamy, well-stirred variety.
- Q: How can I make these granola cups vegan?
- A: It’s simple! Just ensure you use maple syrup instead of honey as your sweetener. Also, double-check that your chocolate chips (if using for topping) are dairy-free. Most dark chocolate varieties with a high cocoa percentage are naturally vegan, but always check the label.
- Q: Are these granola cups gluten-free?
- A: They can easily be made gluten-free. The main ingredient to watch is the rolled oats. Oats are naturally gluten-free, but they are often processed in facilities that also handle wheat, barley, and rye, leading to cross-contamination. To ensure they are gluten-free, purchase oats specifically labeled “certified gluten-free.” All other typical ingredients in this recipe are naturally gluten-free, but it’s always good practice to check labels if celiac disease or severe gluten sensitivity is a concern.
- Q: How long do these Almond Butter Granola Cups last, and how should I store them?
- A: Stored in an airtight container in the refrigerator, these granola cups will stay fresh and firm for up to one week. Due to the coconut oil, they will soften if left at room temperature for extended periods, especially in warm weather.
- Q: Can I freeze these granola cups?
- A: Yes, they freeze wonderfully! Once they are fully set, place them in a freezer-safe airtight container or a freezer bag, separating layers with parchment paper to prevent sticking. They can be frozen for up to 2-3 months. Thaw them in the refrigerator or let them sit at room temperature for about 15-20 minutes before enjoying.
- Q: My granola cups are too crumbly. What did I do wrong?
- A: Crumbly cups are usually due to a few reasons:
- Not enough binder: You might need slightly more almond butter, honey/maple syrup, or melted coconut oil.
- Not pressed firmly enough: Ensure you compact the mixture very tightly into the muffin cups.
- Not chilled long enough: They need adequate time for the binders to solidify.
- Almond butter too dry: Using a very thick, dry almond butter can prevent proper binding.
- Too many dry add-ins: If you added a lot of extra nuts, seeds, or dried fruit without adjusting the wet ingredients, the mixture might be too dry.
- A: Crumbly cups are usually due to a few reasons:
- Q: Can I reduce the amount of sweetener in this recipe?
- A: Yes, you can reduce the honey or maple syrup, but keep in mind that it acts as a binder as well as a sweetener. If you reduce it too much, your cups might be more crumbly. You could try reducing it by a tablespoon or two and see how the texture holds up. Alternatively, ensure your almond butter is unsweetened if you’re looking to minimize overall sugar.
- Q: What kind of oats are best? Can I use quick oats or steel-cut oats?
- A: Rolled oats (also called old-fashioned oats) are highly recommended for the best texture – chewy yet firm. Quick oats can be used in a pinch, but they absorb liquid differently and may result in a softer, mushier texture. Steel-cut oats are not suitable for this no-bake recipe as they require cooking to become palatable.